Bar Code Scanners for Data Entry
In manufacturing environments, manual data entry takes time and incurs the risk of mis-keyed data corrupting the system. In many areas of the manufacturing process, bar coded data has taken the place of printed text due to space constraints, and to facilitate rapid, accurate data entry via bar code scanners.
From the perspective of the computer receiving the bar coded data, a bar code scanner looks just like a keyboard. The data entered is simply entered very quickly, and automatically – the scanner reads the data with a laser, then “types” the data automatically as it is read.
The XL200 Series machine controller accepts a bar code scanner input for data entry. On top of the unit, there is a 9-pin RS232 communications port ready to receive input data from a bar code scanner.
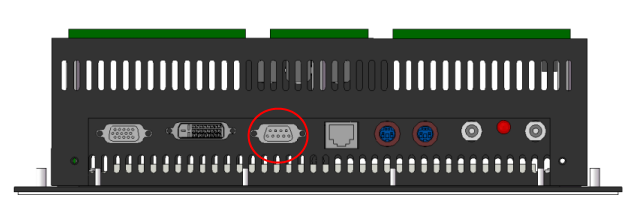
XL200 Rev. D Hardware – RS232 Port Circled in Red
Anywhere the XL200 accepts manual data entry it will also accept a bar coded input. Primarily, the bar code scanner is used for the following types of data entry:
- Coil Inventory Numbers (Coil Numbers)
- Employee Numbers
- Scrap Codes
- Delay Codes (Downtime Codes)
For users of the XL200 Series controller, coupling the machine controller with the power of the Eclipse Production Management System allows for a wide range of data tracking and reporting capability. Most types of production data are downloaded to the machine from the system. Operators are rarely required to request production data via manual entry.
So it is that much of the Operator’s input to the system is limited to raw material inventory numbers, reason codes for items such as scrap and downtime and their own employee numbers. The system doesn’t need the Operator to enter the amount of scrap, downtime or good production. Those numbers are always being measured by the system.
Coil Numbers
When a Machine Operator loads a new coil onto the roll forming line, the system automatically prompts the Operator for the new Coil Number. Coil Numbers are typically printed in bar code format on Coil Tags, attached to each coil via sticky label or “coil card”.
These can be up to 16 characters in length and comprised of alpha-numeric character strings including some special characters. The likelihood for error during manual entry is very high, plus it’s time consuming. The bar code scanner eliminates errors and cuts down on time.
Employee Numbers
Since the Eclipse/XL200 system tracks all information pertaining to production by date, shift, machine and Operator, the XL200 Series machine controller requires Operator input in order to properly account for Operator responsibility.
The system already “knows” the date, time, shift, etc. The controller is also programmed with its particular machine number. One of the few things the controller doesn’t know is who is running the machine at any given time of day. Scanning the employee number is the fastest and easiest way to enter the information so production numbers can be tracked to a particular Operator. Often, management speaks in terms of waste (scrap and downtime), but the system also tracks throughput, good production and run time percentage to each Operator, as well.
The employee number for each Operator can be printed directly from Eclipse in bar code format or from any other system capable of printing one of several recognized bar code fonts. The recommended method for tagging the bar coded data to the Machine Operator is to require all employees to wear ID badges, with their number printed in bar code format, worn on a lanyard or on a clip.
Regardless of whether or not users print employee numbers from Eclipse, the system must still have the information in its database. Employee information should be entered under Maintenance\Employees.
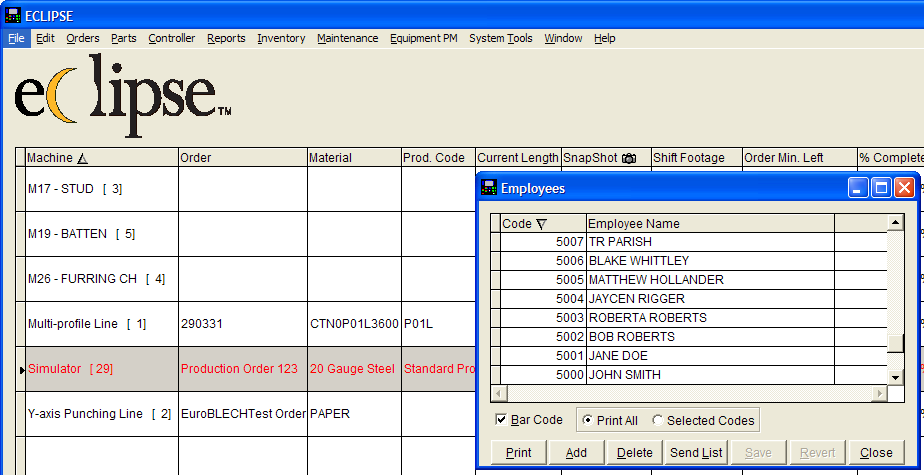
Employee Names and Numbers Recorded in Eclipse
From the same menu, the bar coded information may be printed.
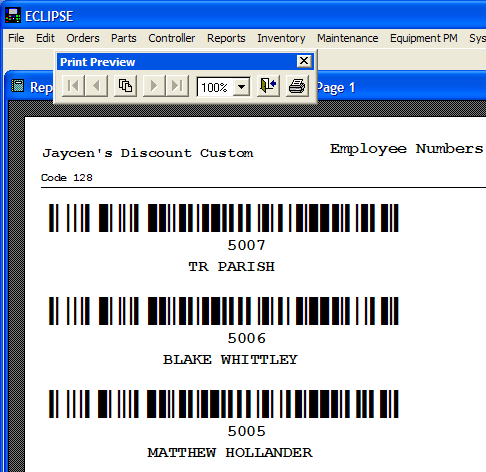
Employee Numbers in Bar Code Format
At the XL200 Series machine controller, an Operator can “log into” the system at any time simply by scanning his bar code. From that instant on, all production (and waste) is reported and tracked to that particular Machine Operator.
Scrap Codes
Scrap Codes allow Eclipse/XL200 system users to require Machine Operators to qualify scrap by reason. Any time the Operator performs an operation at the machine that would produce or record scrap the XL200 Series machine controller can prompt the operator for a scrap reason code.
Scrap Codes are entered in Eclipse under Maintenance\Scrap Code Definitions by the user. Each company has its own reason descriptions for scrap generation, so the codes are user-defined.
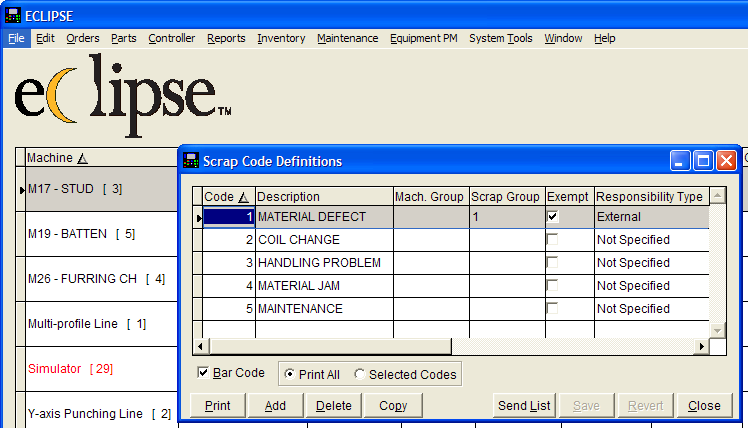
Scrap codes defined in Eclipse
Scrap is recorded at the machine controller whenever the operator performs any of the following actions:
- Manual Shear (where length past the shear is greater than the Manual Shear Scrap Length)
- Increase Quantity
- Remake
- Run a cutlist item with a bundle number of 0 (Automatically categorized by system as “Normal Production Scrap”)
- Run a cutlist item with a bundle number >= 900 (Automatically categorized by system based on last 2 digits of bundle number)
Scrap is also automatically recorded whenever a Tailout situation occurs. This functionality is mentioned only to be thorough when explaining scrap records. See more information on the Tailout function here.
From the list above, the last two actions cause the system to automatically categorize scrap production based on a number programmed by the Operator. The first three (Manual Shear, Increase Quantity and Remake) require feedback from the Operator in the form of a prompt from the machine controller.
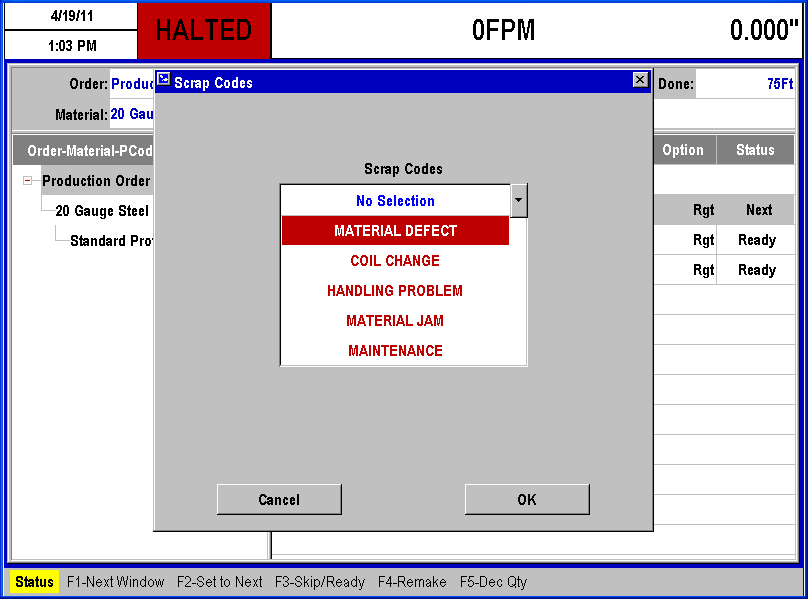
Prompt for Scrap Code Reason after Manual Shear
When prompted for a Scrap Code, the operator can select from the list presented on the XL200 screen, or he can scan a bar code. Scrap Codes can be printed directly from Eclipse in bar code format.
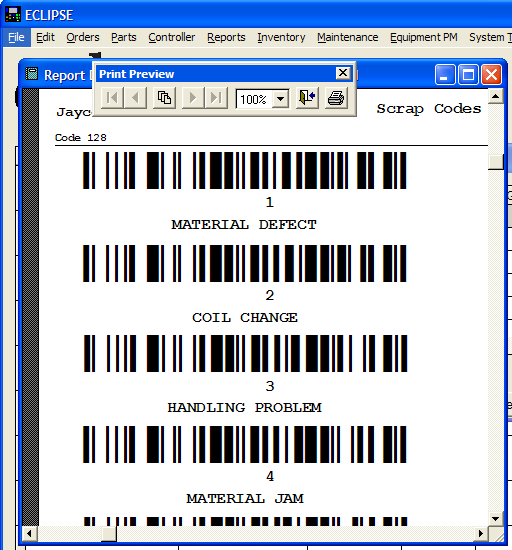
Scrap codes in barcode format
If Scrap Codes will be scanned at the machine, they must be printed from Eclipse, because the bar code includes special leading characters to alert the XL200 machine controller that it is about to receive a scrap code. This function allows the bar code scanner to act as a “shortcut” for the Machine Operator during production when using the Increase Quantity function.
Learn more about Scrap Tracking in our article here.
Increase Quantity
The need to replace one bad part due to raw material problems or handling issues during a production run is common in roll forming. If the Operator was required to stop the line every time this occurred, not only would scrap be incurred, but excessive downtime would also result. That’s why the XL200 Series machine controller allows Operators to replace small quantities on-the-fly.
Assuming the current cutlist item is a sufficiently large quantity and the Operator has time to alert the system to one (or a few) scrap part(s), the Operator can press the Increase Quantity button while the machine is running. Increase Quantity alerts the system that parts previously produced and counted as “good” were in fact scrapped out, and now the system needs to replace those scrap parts with new, good pieces. As mentioned above, the controller prompts the Operator for a number of parts to re-produce, as well as the asking for the Scrap Code reason.
Using a bar code scanner, the Operator can bypass the menu prompts from the controller. He simply scans the appropriate Scrap Code bar code the appropriate number of times, and the system will automatically add that quantity to be re-produced, while simultaneously categorizing each scrap part based on the bar code scanned.
For instance, assume an Operator is running a large batch of galvanized product. As he’s running, he notices two parts come out of the machine with bad galvanizing. Right around this same time, one of the parts is accidentally knocked off the top of the stack, damaging a corner of the part and rendering it unusable.
The operator simply picks up his bar code scanner, and while the line is running, scans the bar code for “Defective Material” twice – and the bar code for “Handling Damage” once. The system produces 3 new parts to compensate for what was scrapped, while automatically tagging 2 parts worth of scrap as “Defective Material” and one part for “Handling Damage” – all of which shows up in the Production Reports at the end of the shift when the Production Manager examines his shift data.
Downtime Codes
Downtime Codes allow the Machine Operator to categorize downtime by reason. Anytime the production line halts for any reason, downtime is tracked and reported by the system. The system requires a Downtime Code entry from the Operator whenever the machine has been halted longer than the programmed Minimum Halt Delay. The Operator is not allowed to put the machine back into Run mode until a Downtime Code is entered.
Downtime Codes are entered in Eclipse under Maintenance\Delay Code Definitions by the user. Each company has its own reason descriptions for downtime, so the codes are user-defined.
The Machine Operator can manually initiate the Downtime Code reason prompt by navigating through the XL200 menus (Production Data\Downtime\F2-Change Employee\Delay). This is the same menu that pops up automatically if the Operator attempts to put the line into Run after a long delay.
Downtime is always being tracked by the XL200 Series machine controller. While the Operator is required to enter a Downtime Code if the machine has been halted too long, he’s allowed to enter Downtime Codes whenever appropriate. He does not need to wait for an on-screen prompt from the controller.
The Operator should be in the habit of entering Downtime Codes whenever he transitions from one task to another. Entry of Downtime Codes is made easy for the Operator when he can scan them into the system with a bar code scanner.
Example
Assume the Operator has just come back from morning break (15 minutes). When he arrives back at the roll former, he realizes he needs to perform a coil change (30 minutes). After changing the coil, a supervisor alerts him to a safety meeting (1 hour). If the Operator waits for the prompt before selecting his Downtime Codes, the system will record them along with their times in the sequence and timing entered at the machine. In this case, after all this time, the operator selects morning break when prompted, then immediately enters coil change and safety meeting (since that’s what he was doing, and the order in which he performed the tasks). That being the case, the system might report:
- 1hr 45 min morning break
- 2 sec coil change
- 2 sec safety meeting
If Downtime Codes are printed in bar code format, and the Operator is allowed to scan in his delay reasons, he can quickly and easily account for his time at the roll former. Any time he transitions from one procedure to another, he simply grabs his scanner and triggers it on the appropriate bar coded reason.
Downtime Codes must be printed from Eclipse in bar code format. This is because each bar code includes leading characters that let the system know a Downtime Code is about to be entered, thus bypassing the need to navigate on-screen menus.

Downtime Codes in Bar Code Format
Summary
Manual data entry is a source of error and wasted time in production processes. Automated scanning and entry of critical data eliminates error and minimizes downtime.
Bar code scanners are a cheap and effective way to automate data entry in roll forming. The XL200 Series machine controller supports data entry via bar code scanner input and the Eclipse Production Management System makes generation of bar coded data easy. Eclipse also formats many bar codes so menu navigation at the machine level is minimized for the Operator, making his efforts faster and more efficient.