


Boosted Dies
A boost is a hydraulic or pneumatic cylinder used to “shove” a punch or cut tool up to material speed on a roll forming machine. This method of die acceleration is crude and less precise than servo actuation, but it’s cheap and effective. Typically, a boost is only used when the material is not strong enough to support the weight of the die. In this case, the boost helps by pushing the die out as the press is firing so the tooling is already in motion by the time it hits the material.
Boosts are not really used for accuracy, and the boost should not play a role in determining calibration or accuracy on the machine. When establishing press reaction times, the boost should be completely disabled if at all possible. Once the press reaction times and calibration are established, then the boost should be reconnected and it’s timing established. The function of the boost is to prevent material deformation due to the forces involved when trying to use the material to accelerate the weight of the die.
In AMS controllers, the boost output and the press output have a special relationship based on the series of controller (MP300, XL100, XL200). It’s important to understand this relationship to get the best results from the equipment. There are four parameters that work together to determine the timing states of the two outputs; Press (or Shear) Dwell, Press (or Shear) Reaction, Boost Dwell, and Boost Reaction.
MP300, XL100 Series and XL 200 series (up to v2.06)
The Shear Dwell parameter should be set to a time corresponding to the time required to break through the thickest/strongest material run on the machine. This time is found by trial-and-error, requiring the user to load his thickest material into the shear and perform a standing cut, increasing or decreasing the Shear Dwell parameter until just enough time is programmed to break through the material with a single press fire. For the purpose of this document, it is assumed that a Shear Dwell time of 0.1 s is sufficient to break through the thickest material run, and that the shear/boost combination is installed on a functioning roll forming machine.
With only the Shear Dwell set, the corresponding boost output will turn on at the same time and for the same amount of time as the its press output. A shear/boost combination is programmed only with Shear Dwell time. Both the shear and the boost will turn on for 0.1 s of time.
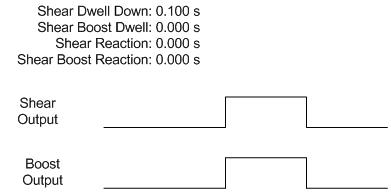
Press and Boost Fire at the Same Time
Because of the nature of attempting to hit a moving target, it is necessary to compensate for speed changes on the machine. The Shear Reaction parameter handles the time error induced when speed changes occur. While establishing the Shear Reaction time, the boost cylinder should be disabled so that it does not impact the operation of the shear die. This can typically be accomplished by removing the solenoid to the valve that controls the boost. The test for Shear Reaction can then be performed at a speed slow enough that the material will support the weight of the die without the boost. Learn more about Press Reaction calculations.
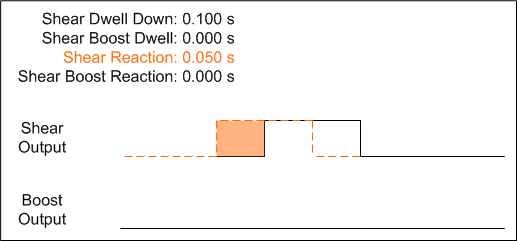
Once the shear’s reaction time is determined, it is entered into its corresponding parameter. This affects both the shear and the boost. Because the boost output is tied to the shear output, both signals are shifted forward in time by the programmed reaction time. Both outputs will turn on 0.05 s earlier, and off 0.05 s earlier. The original timing states are shown to represent the original starting point.

Shear Reaction Shifts Both Outputs Forward in Time
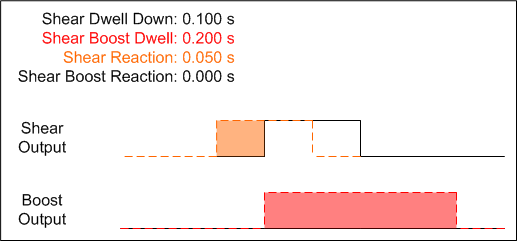
After entering the parameters above, the boost is reconnected to the die and some sample parts are run. Often at this point, it might be observed that the die is dragging, or “hanging up” on the leading edge of the material. To solve this problem, some amount of Shear Boost Dwell is added to continue pushing the die forward as the tooling retracts out of the material.
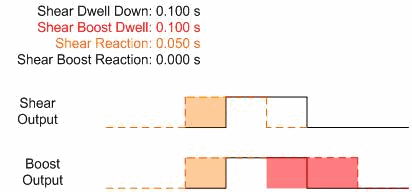
Adding Boost Dwell Can Prevent the Die from Hanging
This is the first time that the boost begins to behave differently from the shear. Up to this point, the boost turned on at the same time, and for the same amount of time as the shear. Now, the boost stays one for an extra 0.1 s for a total time of 0.2 s. Even though the shear and boost are fired simultaneously, the boost stays on longer, allowing the shear to retract with no back pressure on the material. However, at higher speeds, the user might notice some buckling on the leading edge of the next piece. This is an indication that the shear die is not fully up to speed by the time the blade contacts the material. To solve this problem, Shear Boost Reaction is added as a way to get the shear die moving earlier, so the die has time to more closely meet line speed by the time the blade contacts material.
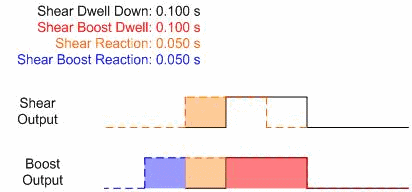
Shear Boost Reaction Pre-fires the Boost
Even though the issue of material buckle on the leading edge of the next piece has been solved, shifting the output forward in time has brought the system back to the point where both the boost output and shear output are turning off at the same time. The shear might begin to hang up on the leading edge of the material again, so even more Shear Boost Dwell time could be required for consistent operation.
XL200 Series (v2.10 and later)
Starting with v2.10, it was decided that the XL200 series controller should allow the user completely independent control of the press and boost outputs. This significantly impacts the functionality of the boost output, especially if the user is familiar with the old operation method.
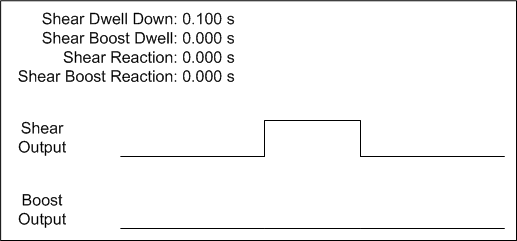
The Shear Dwell parameter functions identically in both the old and new software versions. The time entered must still be found by trial-and-error by performing standing cuts on the thickest material that will be run through the machine.
With only the Shear Dwell set, the corresponding boost output will not turn on. A shear/boost combination is programmed with Shear Dwell time. Only the shear will turn on for 0.1 s of time.
Shear and Boost Outputs are Independent of Each Other
In any mode of operation, the system must account for the reaction time of the press in order to make accurate parts from start to finish and through all speed ranges. While establishing the Shear Reaction time, the boost cylinder should be disabled so that it does not impact the operation of the shear die. This can typically be accomplished by removing the solenoid of the valve that controls the boost. The test for Shear Reaction can then be performed at a speed slow enough that the material will support the weight of the die without the boost. Learn more about Press Reaction calculations.
Once the shear press reaction time is determined, it is entered into its corresponding parameter. This only affects the shear output. The boost output “on” state will be based on the original target coincidence point (where the shear would have originally turned on).
Shear Reaction Only Affects Shear Output
After entering the parameters above, the boost is reconnected to the die and some sample parts are run. Often at this point, it might be observed that the die is dragging, or “hanging up” on the leading edge of the material. To solve this problem, some amount of Shear Boost Dwell is added to continue pushing the die forward as the tooling retracts out of the material.
Shear Boost Dwell Pushes the Die and Keeps it Moving
At this point, the shear is fired 0.05 s before the boost turns on. When the boost is fired, it stays on longer than the shear output, allowing the shear to retract with no back pressure on the material. However, at higher speeds, the user might notice some buckling on the leading edge of the next piece. This is an indication that the shear die is not fully up to speed by the time the shear blade contacts the material. To solve this problem, Shear Boost Reaction is added as a way to get the shear die moving earlier, so the die has time to more closely meet line speed by the time the blade contacts material.

Boost Output is Fired Before Shear Output
After the last parameter change, the boost output fires 0.05 s before the shear output, helping to bring the die up to material speed before the blade contacts the material. Because of the shift in reaction time, it might be necessary to go back and increase the Shear Boost Dwell parameter to force the boost to keep pushing the die as the blade retracts out of the material, if the material starts to hang up on the blade again.
