


On this page
-
Technical Support
-
- A Case for Computer Integrated Manufacturing (CIM)
- Basic Methods of Length Control
- Benefits of Computer Integrated Manufacturing (CIM) - Deutsch
- Coil Handling
- Continuous Improvement - Tube & Pipe Journal
- Continuous Improvement in Roll Forming
- Encoder Tracking and Mounting
- Improving Roll Forming Operations
- Part Marking
- Roll Forming and Industry 4.0
- Roll Forming: The Four Basic Machine Types
- Servo Control for Improving Roll Formed Production
-
-
XL200 Series Support
-
- Battery Replacement
- Calibrating the Touchscreen of an XL200 Controller
- Extending XL200 Controls with PLC Integration
- Solving Memory Loss and Computer Lockup Problems
- Using Product Codes for Machine Positioning in the XL200 Series Controller
- Using Setup Configurations in the XL200 Series Controller
- Using Tool Configurations in the XL200 Series Controller
- XL200 Direct Ethernet Communication with Eclipse Classic
-
- Bar Code Scanners
- Bar Code Scanners for Data Entry
- Boosted Dies
- Calculating Press Reaction
- Checking Press Consistency with Oscilloscopes
- DIP Switch Configuration
- Punch Programming on the XL200
- Sending Saved Parameters or Tool Libraries from Eclipse Classic to XL Controller
- Understanding the XL200 Part Queue
- Using Product Codes for Machine Positioning in the XL200 Series Controller
- Using Setup Configurations in the XL200 Series Controller
- Using the Stitching Feature
- Using Tool Configurations in the XL200 Series Controller
- XL200 Error Codes
- XL200 Parameters
-
- BOSS Shear
- Brake & Hump - XL200CLU
- Calculating Press Reaction
- Checking Press Consistency with Oscilloscopes
- Closed Loop Flying Die / Die Accelerator
- Closed Loop Stopping
- Coil End Point
- Extending XL200 Controls with PLC Integration
- Open Loop Flying Die
- Open Loop Stopping / Feed-to-Stop
- Tailout Sensor
-
Eclipse Pro Support
- Alert: Eclipse-COMM may be offline
- Alert: Material code XXXXXXXX does not correspond to a known material
- Checking the Status of Eclipse Pro Services
- Connect to Eclipse Pro from a Network Connected Device
- Eclipse Pro Hardware Requirements
- Eclipse Pro Product Sheet
- Eclipse Pro Product Sheet - Spanish
- Eclipse Pro Release Notes
- Eclipse Pro Scheduler
- Eclipse Pro Wallboard Andon App Setup
- Error: "Duplicate material codes. MATERIAL =..."
- Machine Performance Standards
- Nucor Case Study
- Requesting Eclipse Pro Support
- Schedule Sync Table Definition
- Updating Eclipse Pro
- Show all articles ( 1 ) Collapse Articles
-
Eclipse Support
-
- A Case for Computer Integrated Manufacturing (CIM)
- Benefits of Computer Integrated Manufacturing (CIM) - Deutsch
- Coil Inventory Management with CIM
- Improving Production Capacity with Computer Integrated Manufacturing (CIM)
- Mistakes Happen! CIM for Mistake Prevention in Roll Forming
- Roll Forming and Industry 4.0
- The Quality Gap
-
- Automatically Starting Eclipse Classic
- Cable Specifications for RS Communication
- Coil Validation
- Creating an Eclipse Classic Package File
- Deleting Done Orders in Eclipse Classic
- Eclipse Classic Hardware Requirements
- Eclipse Classic Permissions - XLSecurity.exe
- Eclipse Connections
- Eclipse Data Exchange Options
- Establishing Communication with Eclipse
- Implementing Scrap, Delay, and Employee Codes in Eclipse Classic
- Interfacing Eclipse to External Data Systems - Importing and Exporting
- Material Code Query
- Missing Snapshot or Dates for Reports in Eclipse Classic
- Order Downloading Options in Eclipse Classic
- Performing Eclipse Classic Automatic Backups
- Performing Eclipse Classic Manual Backups
- Preventative Maintenance Made Easy
- Replacing a Controller / Recovery from a Memory Clear
- Reporting from Archived Data
- Reporting from Archived Data
- Requesting Eclipse Classic Support
- Sending Saved Parameters or Tool Libraries from Eclipse Classic to XL Controller
- Using a Proxy Server
- VLINX ESR901 Converter Installation and Configuration
- Show all articles ( 10 ) Collapse Articles
-
Pathfinder Support
-
- Calibrating the Backgauge - Pathfinder v2
- Calibrating the Machine - Pathfinder v2
- Calibrating the Touchscreen - Pathfinder v2
- Cleaning Controller Screens
- Extracting the Pathfinder SDF from a 5XXX/6XXX Machine
- Installing TeamViewer
- Pathfinder PC Backup/Restore/Import Procedure - Pathfinder v2
- Pathfinder PC BIOS Configuration - 5X00
- Pathfinder PC BIOS Configuration - 6X00
- Solving Memory Loss and Computer Lockup Problems
- XL250BB Backup/Restore Function
-
- FoldGuard Alignment Guide
- FoldGuard Alignment Guide - LZS-2-FG
- FoldGuard Brochure
- FoldGuard Encoder Installation Manual 1-02
- FoldGuard Frequently Asked Questions (FAQ)
- FoldGuard Operation Manual
- FoldGuard System Installation Manual 1-06
- FoldGuard System Installation Manual 1-07
- Laser Distortion Causes and Solutions Manual 1-02
-
Pathfinder Edge Support
-
- Accessing Pathfinder Edge
- Installing TeamViewer
- Logging into Pathfinder Edge
- Pathfinder Edge - Profile Object Format
- Pathfinder Edge Published API
- Print an Approval or Production Sheet - Edge
- Understanding Settings - Edge
- Using Categories and Subcategories - Edge
- Using the Profile Editor - Edge
- Using the Profile Library - Edge
-
Accessories Support
-
- Indraworks DS Tuning Procedure (Analog) for CSB02_1 Control Sections
- Indraworks DS Tuning Procedure (Analog) for HCS01_1E Cs Servo Drives
- IndraWorks DS Tuning Procedure (EtherCAT) for CSB02_1 Control Sections
- IndraWorks DS Tuning Procedure (EtherCAT) for HCS01_1 Drives
- Indraworks DS Tuning Procedure (SERCOS II) for CSB01.1 Control Sections
-
MP Series Support
-
- MP300 Series Controller Manual
- MP300CL Series Controller Manual
- MP325 Manual
- MP328 Gripper Manual
- MP328CL Gripper Manual
- MP338 Backgauge Manual
- MP338DH Dual Backgauge Manual
- MP342 Manual
- MP343 Manual
- MP350PFD Manual
- MP450S Installation Guide
- MP465 Installation Guide
- MP465 Operator Manual
- MP465N Operator Manual NTM
-
-
Legacy Product Support
-
- About the MP401
- Cleaning Controller Screens
- CMP1000 Reference Manual
- CMP11-10 Reference Manual
- CMP12 Reference Manual
- MP100 Reference Manual
- MP101 Reference Manual
- MP101 v2 Reference Manual
- MP103 Reference Manual
- MP103 v3 Reference Manual
- MP237 Reference Manual
- MP257 Reference Manual
- MP37 Reference Manual
- MP38 Reference Manual
- MP39 Reference Manual
- MP401 User Manual
- MP43 Reference Manual
- MP44 Reference Manual
- MP450 Installation Guide
- MP450 Operator Manual
- MP450S Installation and Technical Reference Manual
- MP450S Installation Guide
- MP450S Operator Manual
- MP450Z Operator Manual
- MP46 Reference Manual
- MP465N Operator Manual NTM
- MP54 Reference Manual
- MP55 Reference Manual
- MP550 Operator Manual
- MP56 Reference Manual
- MP57 Reference Manual
- Show all articles ( 16 ) Collapse Articles
-
Calibrating the Backgauge – Pathfinder v2
- Login to Pathfinder as Administrator
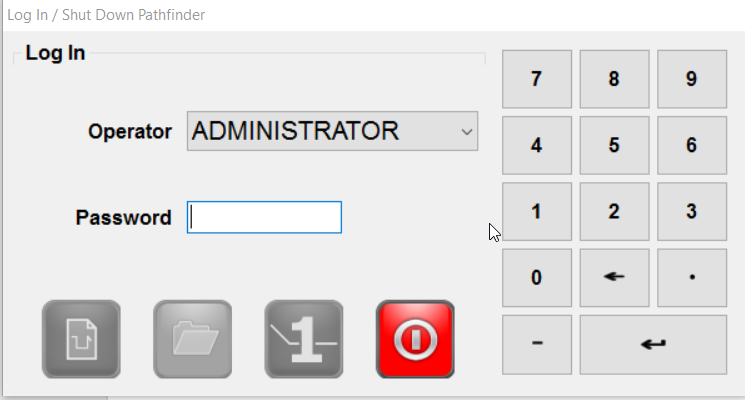
Figure 1 – Login as Administrator
- Click Tools button at the top (displayed with red arrow)
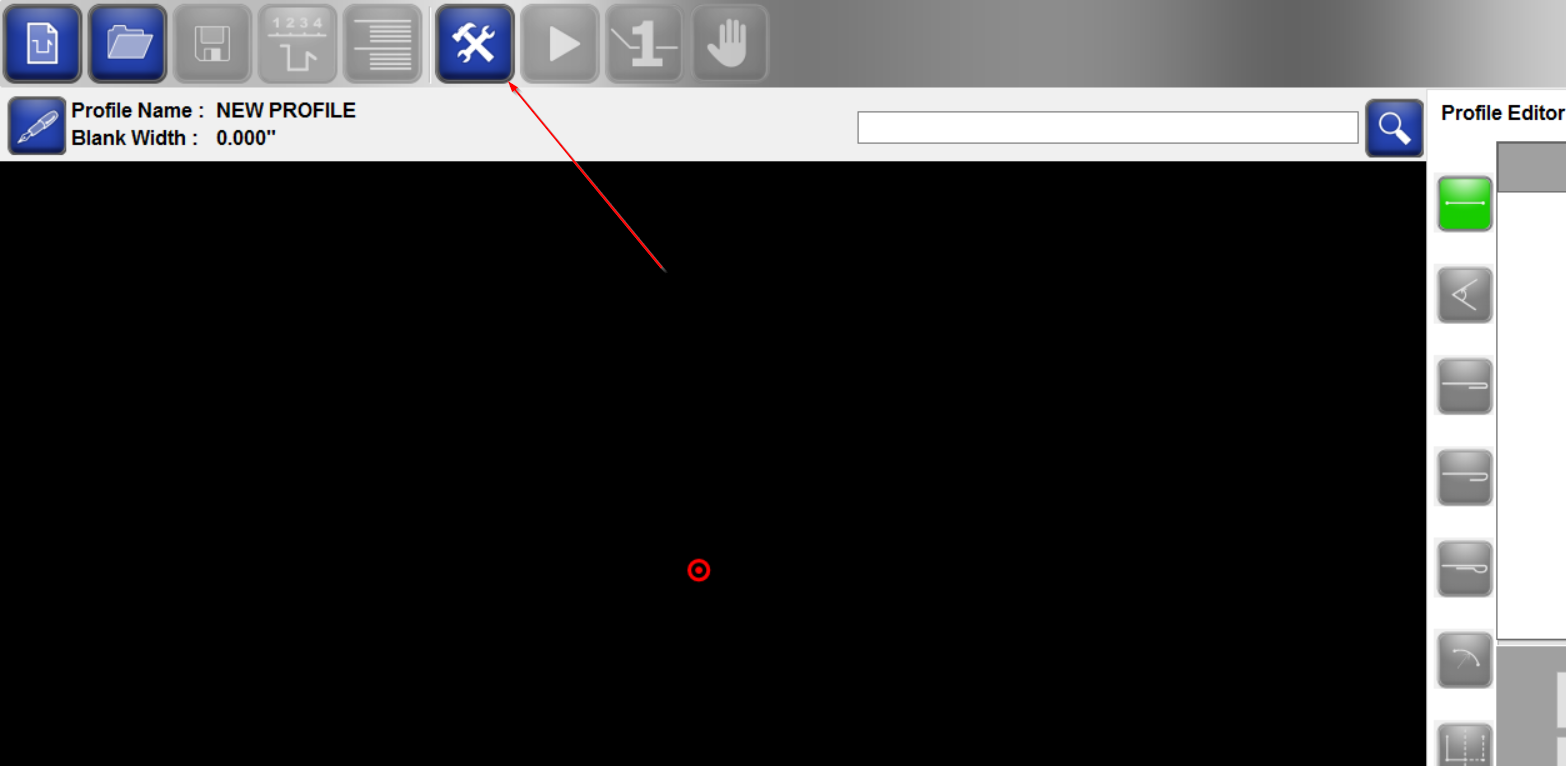
Figure 2 – Select Tools Screen
- Record your ‘122 Home Position’ and ‘131 Encoder Resolution’ parameters.
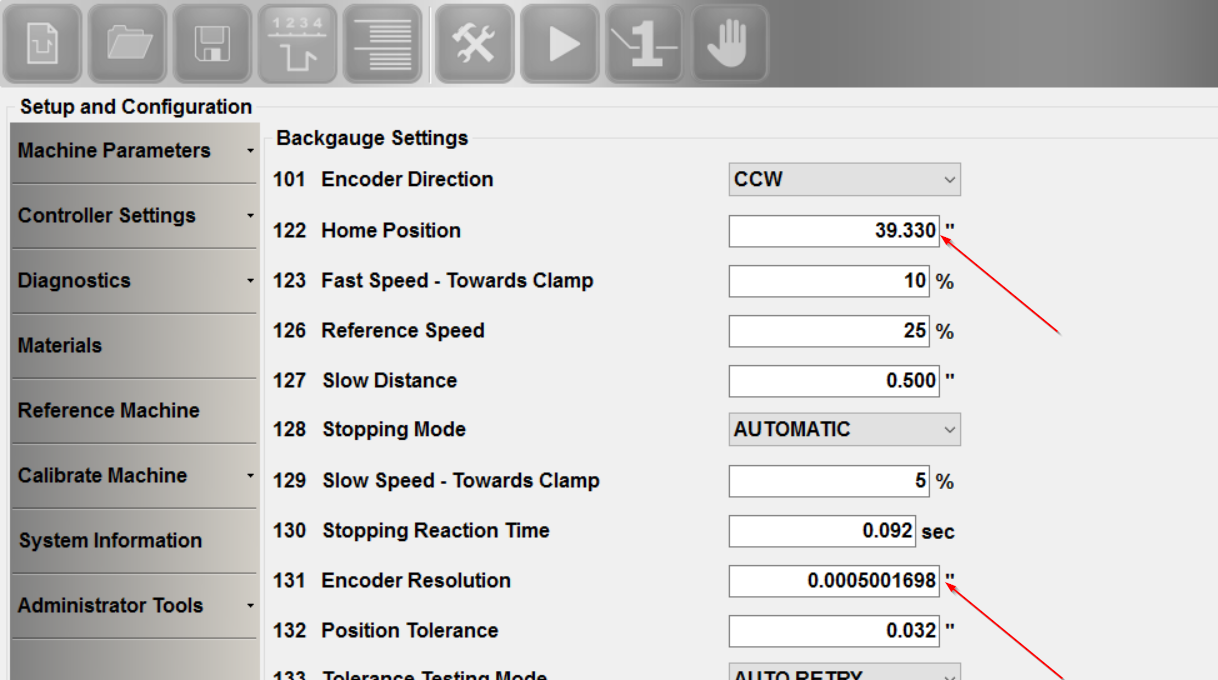
Figure 3 – Record Parameters
- Reference your Backgauge by clicking Reference Machine on the left hand side.
- The ‘Reference Backgauge’ button is shown in the picture below. Hold this button down, the backgauge will move backward to the home switch, stop, and move forward a small amount. You should see a message saying “All Machine Axes Are Referenced” in the white area on the right side, confirming that the machine is referenced. If you do not see this message, reference the backgauge again until you do see it.
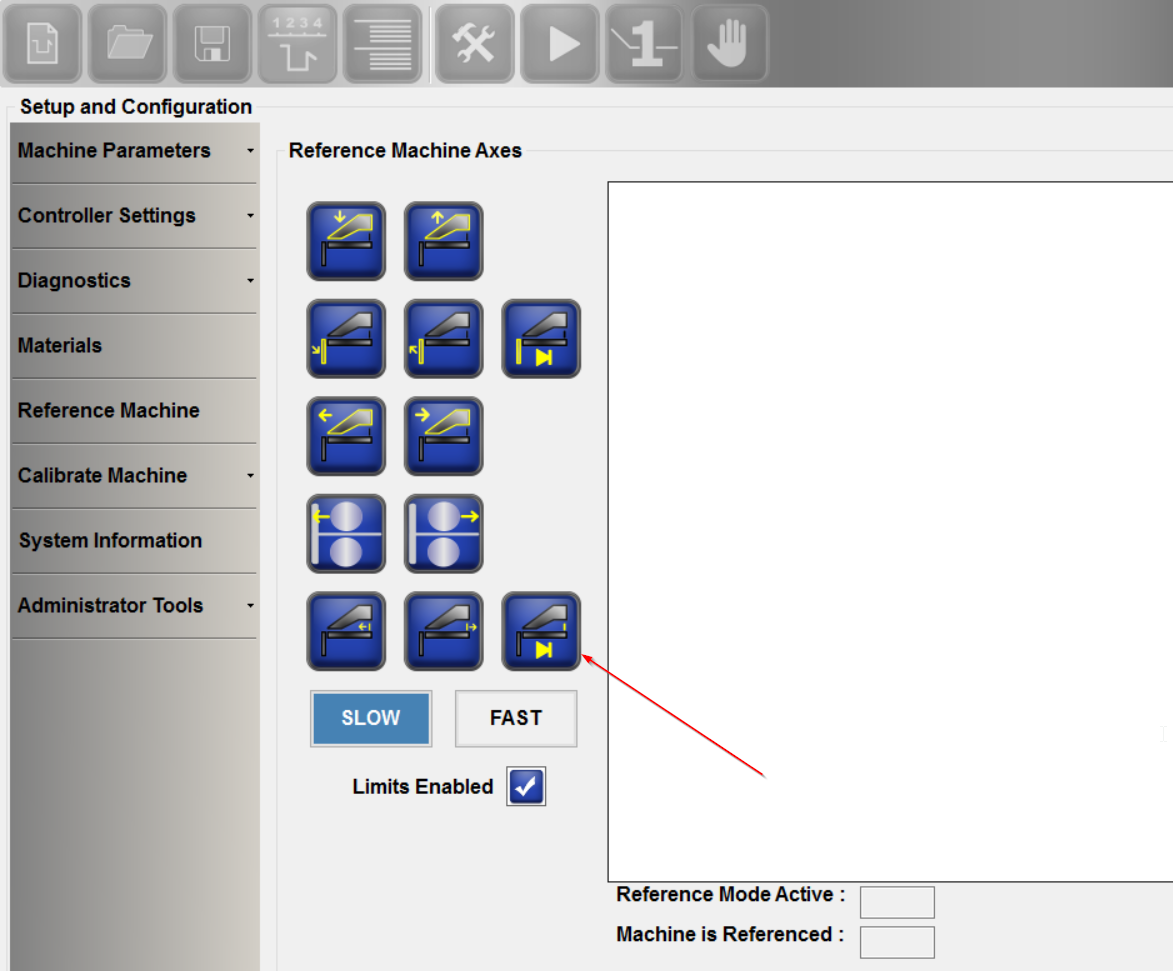
Figure 4 – Reference Backgauge
- Now that your Backgauge is positioned slightly in front of the home switch, note what your ‘X’ value reads for Backgauge Position. Record this as your “Expected Length 1”.
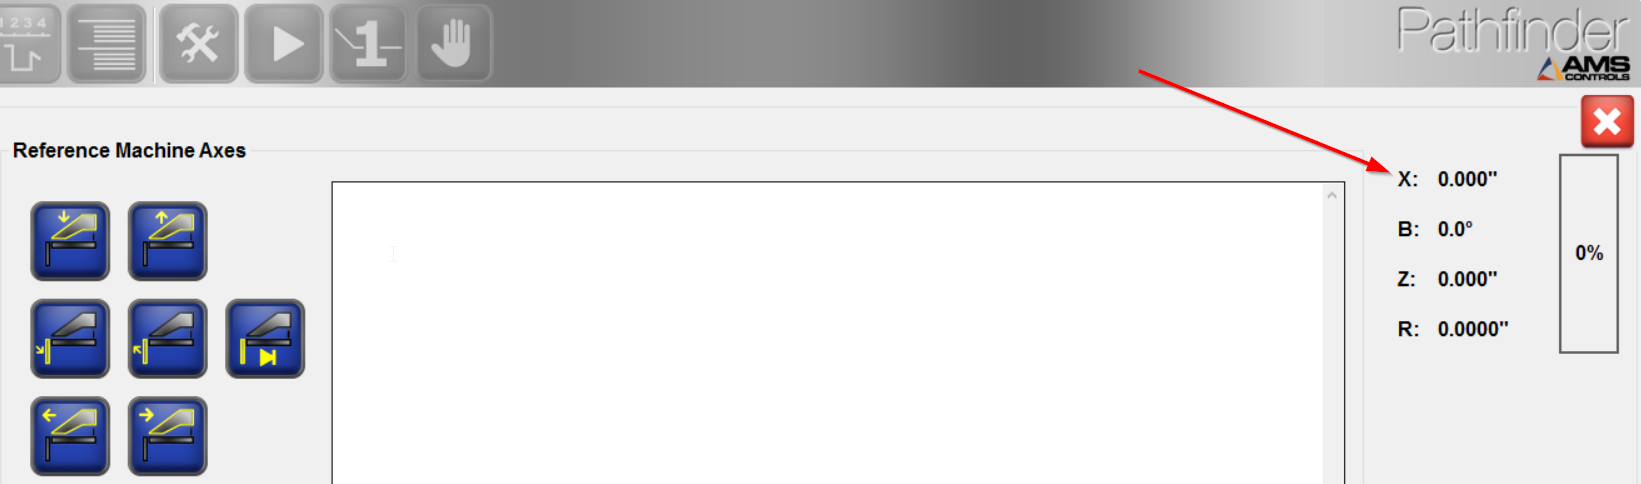
Figure 5 – Record Expected Length 1
- Measure where you Backgauge is at physically with calipers (or tape measure), as your “Actual Measured Length 1”. Note that you are measuring where the metal would be placed in the ‘back’ location of your Backgauge.
- If these values are not equal, or close to equal, your ‘122 Home Position’ parameter needs to be adjusted. If they are equal, or close to, your Home Position is set correctly. Skip steps 9-13.
- To adjust the ‘122 Home Position’ parameter, click Machine Parameters on the left hand side and then Backgauge.
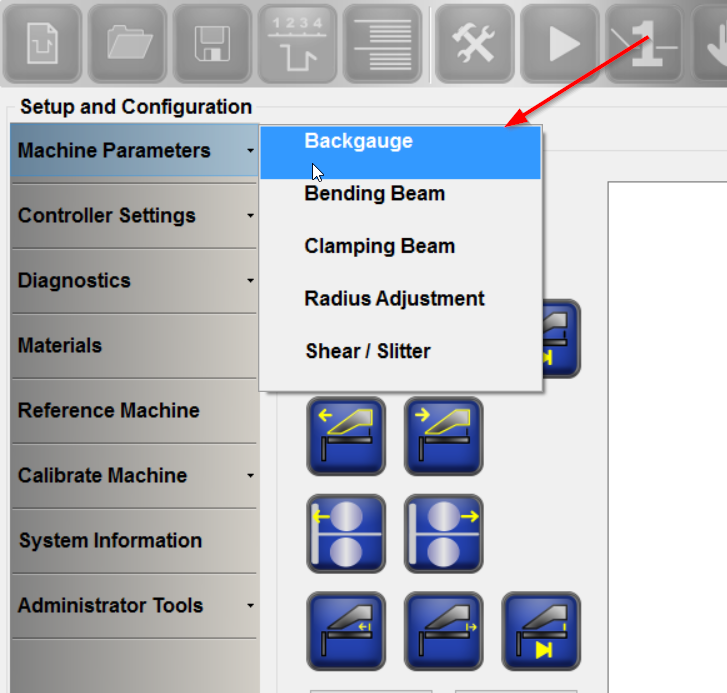
Figure 6 – Select Machine Parameters/Backgauge
- Find your ‘122 Home Position’ Parameter and change this value by the amount that it is off. For example, say your Actual Measured Length 1 is 38.00”, your Expected Length 1 is 38.25”, and your Home Position is set for 39.00”.
- Subtract 38.25” – 38.00” to get 0.25”.
- Change your Home Position by 0.25”.
- 00” – 0.25” = 38.75”.
- New ‘122 Home Position’ of 38.75”.
- Input your New ‘122 Home Position’ value of 38.75” and press Enter.
- Reference your Backgauge again (steps 4-5) by clicking Reference Machine on the left hand side.
- Go back to Step 6 and record a new Actual Measured Length 1 and Expected Value 1. These should now be equal or close to equal. If they are not, repeat this process until they are.
- At this point, you have values for Actual Measured Length 1 and Expected Length 1 for a specific physical location of the Backgauge. To determine if the Encoder Resolution needs to be corrected, you need another physical location.
- Go to the One-Step Operation Mode by clicking the ‘1’ button at the top shown here: . You will see the screen below.
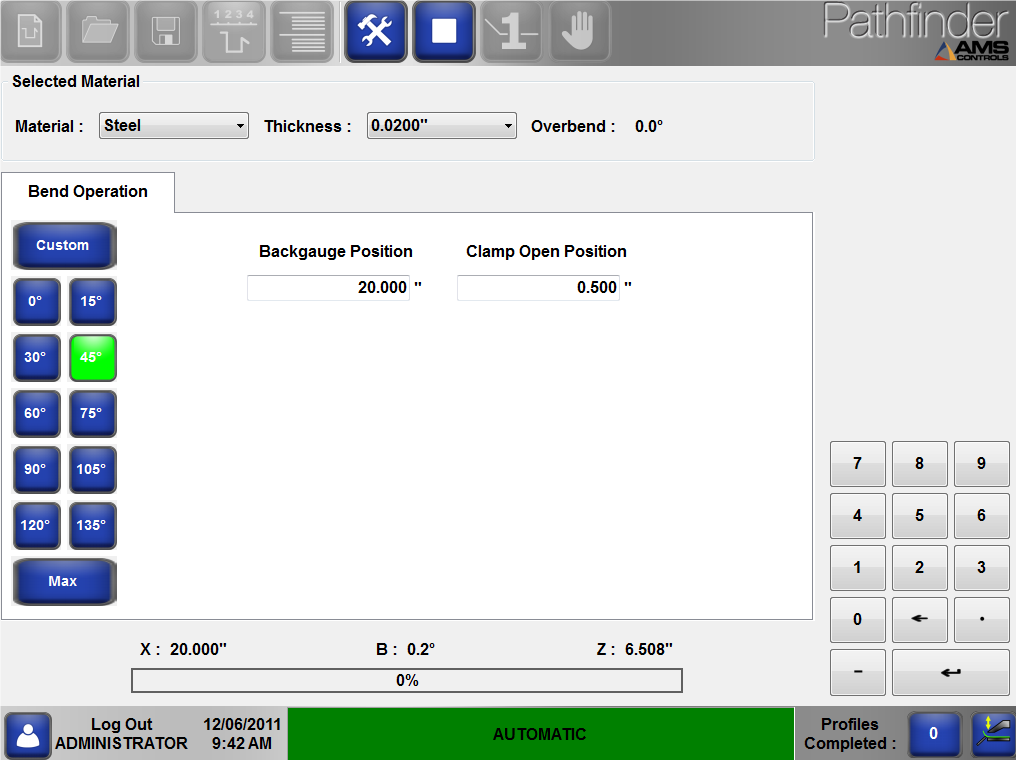
Figure 7 – One-Step Operation Mode
- For ‘Backgauge Position’, put in 1.00” so we can use the full length of the machine for the calibration. Using the full travel of the Backgauge will ensure our Resolution is most correct.
- Find the ‘X’ value for Backgauge Position in the bottom left hand corner. This is going to be your “Expected Length 2” value.
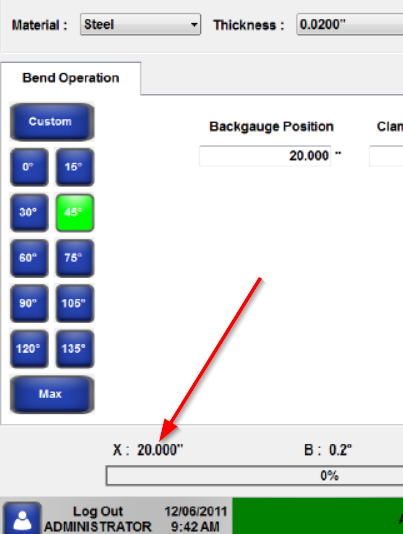
Figure 8 – Finding Expected Length 2
- Measure the Backgauge position with your calipers (or tape measure) again, record this as your “Actual Measured Length 2” value.
- You now have the values needed to calculate a new ‘131 Encoder Resolution’ value. Use the following equation:
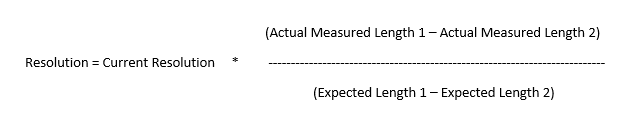
- Enter your New Resolution value into the ‘131 Encoder Resolution’ parameter in your Backgauge Parameters.
- Reference your Backgauge again (steps 4-5) by clicking Reference Machine on the left hand side.
- Test some different physical locations on your machine and confirm that the ‘X’ Backgauge Position values equal the lengths you measure.
- If they do not, repeat this process until it does.
Tags:
