


Dual Line Encoders – Reducing Scrap with an XL200 Controller and Two Line Encoders
Introduction
Why Dual Line Encoders
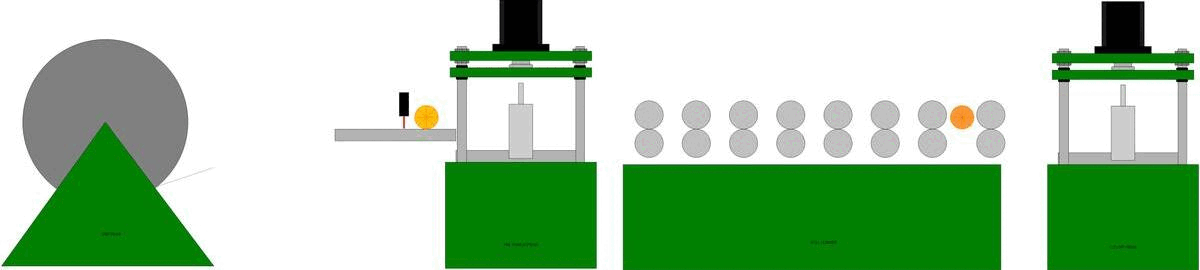
On some machines, Dual Line encoders can help save on scrap that would occur on coil thread-up or coil tail-out. For example, if you have a punch press at the entry of a long roll-former you would like to have an encoder close to that press so that you can start punching the material right away before the entire roll-former is full of un-punched material that may need to be scrapped. Conversely, when the coil tails out, you want to have an encoder on the exit end of the roll-former, near the shear, so that most of your pre-punched material can be sheared into good parts.
The feature described here replaces the method that was used on older controllers that have only two encoder ports. The old method used an Encoder Switcher, dual sensors, and external logic to switch between encoders routed to a single encoder port.
Document Scope
This document describes the operation of the controller when the Dual Line Encoder feature has been enabled. It is not intended to be a comprehensive description of controller operation.
How should it work?
When threading up a new coil, the encoder on the entry side of the machine closest to the un-coiler needs to be active to begin measuring material as soon as possible. Before or during the coil tail-out process the encoder on the exit side of the machine closest to the shear needs to begin being used so that the material can be tracked as far as possible.
What is required to make it work?
- The controller needs to know when material is present, when its tailing-out and when it is threading up. It uses a sensor for this.
- The controller needs to know where the encoders are, and where the sensor is.
The controller uses the tail-out sensor input to detect when material is present, threading up or tailing-out. The controller has setups that must be configured that are used to tell the controller where the two encoders are.
Theory of Operation
This is a simplified theory of operation of the thread-up and tail-out process. More details are provided later. The tail-out sensor must be located near the entry encoder so that the material is sensed just prior to contacting the encoder during a thread-up. When the sensor turns from ON to OFF, tailed-out to not tailed-out, the controller knows that material has been threaded, it knows where the leading edge of the material is because it knows where the sensor is. It also knows where the exit encoder is. When enough encoder counts from the entry encoder have accumulated, the controller knows that the material is under both encoders, and it can use either encoder to track the material. It may switch to using the exit encoder anytime. Now if the tail-out sensor turns from OFF to ON the controller knows where the trailing edge of the material is and that the coil is tailing-out. If it hasn’t already, it must switch to using the exit encoder to track material because the coil is tailing out. When the trailing edge of the material gets to the exit encoder the controller halts the line and considers the coil completely tailed out.
Encoder Identification
In the software and user interface the two line encoders are described in two ways due to practices used prior to this feature existing and an attempt to be more clear. Some legacy settings will use the numbers 1 and 2 to identify which setting applies to which encoder. Options in new settings will use descriptions Exit(1) and Entry(2) in order to be more clear re-enforce the relationship. Encoder 1 is Exit(1) and Encoder 2 is Entry(2). These numbers must not be mistaken for which external encoder port the encoders are wired to. That will be covered later.
Controller Settings
Encoder Resolutions
Due to the variations in encoder wheels and the material stretch that is caused when forming material in a roll-former, there are two encoder resolutions, one for each line encoder.
Line Resolution
This is the resolution for the Exit(1) encoder.
Resolution 2
This is the resolution for the Entry(2) encoder.
Main Encoder
The Main Encoder setting has two options, Exit(1) or Entry(2). It defaults to Exit(1). It allows the user to decide which encoder the machine will use most of the time and when it switches from the Entry(2) to the Exit(1) encoder.
When set to Exit(1) the controller uses the Exit(1) encoder most of the time. It switches from Entry(2) to the Exit(1) encoder during thread-up as soon as material is under both encoders.
When set to Entry(2) the controller uses the Entry(2) encoder most of the time. It switches from Entry(2) to the Exit(1) encoder when the tail out input turns on.
Additional effects of the Main Encoder Setting
The encoder that is not selected is considered the Auxiliary encoder. The controller calculates encoder targets and other internal variables based on the resolution of the Main Encoder. When using the Auxiliary encoder, the Auxiliary encoder counts are converted to counts as if the controller were running on the Main Encoder so that the rest of the software is unaware that the Auxiliary Encoder even exists.
Auto Correct Auxiliary Encoder
The Auto Correct Auxiliary Encoder has two settings, Enable and Disable. When Enabled, the controller uses the filtered encoder count ratio and corrected resolution for the Main Encoder to automatically set the resolution for the Auxiliary encoder. Setting the resolution rather than correcting it allows the controller to automatically account for any combination of encoder or encoder wheel. When the resolution gets set, the correction factor is set to 100% at the same time.
Because the machine will operate on the Main Encoder most of the time and operators typically Trim Correct periodically, the Main Encoder effective resolution is expected to be accurate.
When the material is under both encoders the controller can determine and set the resolution of the auxiliary encoder. It can do this by assuming the Main Encoder resolution is being periodically corrected by the operator in order to produce good parts. Since both encoders are riding on the same material the controller can use the resolution of the Main encoder and the filtered ratio of sensed encoder counts between to two encoders to calculate the resolution of the Auxiliary encoder. The calculated resolution is only as accurate as the corrections the operator makes on the Main Encoder resolution.
Shear Encoder Switchover Distance
Shear Encoder Switchover Distance is the distance from the shear where the material is known to be fully under the Exit(1) encoder. At this distance, when the Main Encoder setting is set to Exit(1), the controller will switch from the Entry(2) encoder to the Exit(1) encoder. When Auto Correcting the Exit(1) encoder the controller uses this distance on coil thread-up to know when it can begin auto correcting. This distance should be shorter, as measured from the shear than the shear to encoder distance. This parameter replaces the Shear to Encoder distance parameter. A value smaller than the distance between the shear and Exit(1) encoder should be entered.
Shear Tail Out Distance
The Shear Tail Out Distance is the distance from the shear where the material is considered to have tailed out. This distance should be longer than the shear to encoder distance so the controller tails out while still in contact with the Exit(1) encoder. Many times a roll-former is not able to drive the material beyond the Exit(1) encoder. In this case a slightly longer distance, measured from the shear, where the material stops, should be entered. While running or jogging forward, the run status will display TAILING while the material is moving to the Shear Tail Out Distance.
Shear Encoder Distance 2
The Shear Encoder Distance 2 setting should be set to the distance between the Shear and the Entry(2) encoder. When the material is threaded the controller will set the counter to minus this distance. The counter will count up to zero just as the leading edge reaches the shear blade.
Trim Correction Encoder
The Trim Correction Encoder setting allows Trim Correction of either the Entry(2) or Exit(1) encoder. See the Trim Correction Section for best practices.
Tail Out Configuration
The Tail Out Configuration has two settings, Single and Double. It defaults to Double, meaning both encoders are involved in thread-up or tail-out. When set to Single, only the Main Encoder is used for thread-up and tail-out. The controller will tail-out immediately when set to Single. Also, when set to Single, the Auto Correct Auxiliary Encoder setting is effectively Disabled.
The Single setting allows the system to be temporarily operated using a single encoder, selected with the Main Encoder setting. You may need to do this while waiting for repair or replacement of one of the encoders or if the machine has a Front Shear that is used to cut blanks that the Exit(1) encoder never sees.
Trim Correction
To support Trim Correction of the second encoder, two new setups were added. Trim Correction Encoder and Correction Factor 2. Trim Correction Encoder has two settings, Exit(1) and Entry(2). This setting indicates which encoder was used to produce the Last Measured Length part or based on settings, which encoder is the most appropriate to correct.
The ratio of encoder counts between the Exit(1) and Entry(2) encoders is expected to be relatively constant once it is known. Using this knowledge, a trim correction of the Main Encoder is also able to trim correct the Auxiliary encoder at the same time.
The controller uses two methods to determine the ratio between the two encoders.
1) When the encoder resolutions are hand entered. The ratio between the two resolutions is used.
2) While running, the controller monitors both encoders and calculates a filtered ratio of encoder counts between the two encoders based on the number of encoder counts coming in on each port.
Best practice is to leave the Auto Correct Auxiliary Encoder Enabled and only Trim Correct the Main Encoder. Following this practice should result in an accurate resolution for the Auxiliary Encoder on all but its initial use. If the Entry(2) encoder is used as the Main Encoder, by the time the material tails out the Auxiliary encoder will have been auto corrected prior to its initial use.
If Auto Correct Auxiliary Encoder is Disabled, best practice is to Trim Correct the Main Encoder prior to Trim Correcting the Auxiliary Encoder.
A Trim Correction on the Main Encoder preserves the ratio between the two encoder resolutions. A Trim Correction on the Auxiliary Encoder establishes a new ratio. In other words, A Trim Correction on the Main Encoder also corrects the Auxiliary Encoder. A trim correction on the Axillary Encoder, only corrects the Auxiliary Encoder.
When Auto Correction of the Auxiliary encoder is enabled, Trim Correction of the Auxiliary encoder is undesirable and ineffective. It will get overwritten as the controller runs parts and does its auto correction.
Enabling Dual Encoder Support
DIP switch 17 enables the second line encoder, Entry(2). Only version 4 and higher controllers have the Encoder Port hardware to support this feature.
Encoder Port
Open Loop controllers will use port 2 for the second line encoder. Closed Loop controllers will support this feature with port 3.
Forced Encoder Selection
The ability to select between Encoder Ports was also added via an Extended MODBUS input, input 45.
Input 45 ON selects the Entry(2) encoder. Input 45 OFF selects the Exit(1) encoder. When selection is enabled through MODBUS all tail-out logic becomes the responsibility of the external logic. The controller will tail-out immediately when seeing the tail-out input turn ON.
