-
Technical Support
-
- A Case for Computer Integrated Manufacturing (CIM)
- Basic Methods of Length Control
- Benefits of Computer Integrated Manufacturing (CIM) - Deutsch
- Coil Handling
- Continuous Improvement - Tube & Pipe Journal
- Continuous Improvement in Roll Forming
- Encoder Tracking and Mounting
- Improving Roll Forming Operations
- Part Marking
- Roll Forming and Industry 4.0
- Roll Forming: The Four Basic Machine Types
- Servo Control for Improving Roll Formed Production
-
-
XL200 Series Support
-
- Battery Replacement
- Calibrating the Touchscreen of an XL200 Controller
- Extending XL200 Controls with PLC Integration
- Solving Memory Loss and Computer Lockup Problems
- Using Product Codes for Machine Positioning in the XL200 Series Controller
- Using Setup Configurations in the XL200 Series Controller
- Using Tool Configurations in the XL200 Series Controller
- XL200 Direct Ethernet Communication with Eclipse Classic
-
- Bar Code Scanners
- Bar Code Scanners for Data Entry
- Boosted Dies
- Calculating Press Reaction
- Checking Press Consistency with Oscilloscopes
- DIP Switch Configuration
- Punch Programming on the XL200
- Sending Saved Parameters or Tool Libraries from Eclipse Classic to XL Controller
- Understanding the XL200 Part Queue
- Using Product Codes for Machine Positioning in the XL200 Series Controller
- Using Setup Configurations in the XL200 Series Controller
- Using the Stitching Feature
- Using Tool Configurations in the XL200 Series Controller
- XL200 Error Codes
- XL200 Parameters
-
- BOSS Shear
- Brake & Hump - XL200CLU
- Calculating Press Reaction
- Checking Press Consistency with Oscilloscopes
- Closed Loop Flying Die / Die Accelerator
- Closed Loop Stopping
- Coil End Point
- Extending XL200 Controls with PLC Integration
- Open Loop Flying Die
- Open Loop Stopping / Feed-to-Stop
- Tailout Sensor
-
Eclipse Support
-
- A Case for Computer Integrated Manufacturing (CIM)
- Benefits of Computer Integrated Manufacturing (CIM) - Deutsch
- Coil Inventory Management with CIM
- Improving Production Capacity with Computer Integrated Manufacturing (CIM)
- Mistakes Happen! CIM for Mistake Prevention in Roll Forming
- Roll Forming and Industry 4.0
- The Quality Gap
-
- Automatically Starting Eclipse Classic
- Cable Specifications for RS Communication
- Coil Validation
- Creating an Eclipse Classic Package File
- Deleting Done Orders in Eclipse Classic
- Eclipse Classic Hardware Requirements
- Eclipse Classic Permissions - XLSecurity.exe
- Eclipse Connections
- Eclipse Data Exchange Options
- Establishing Communication with Eclipse
- Implementing Scrap, Delay, and Employee Codes in Eclipse Classic
- Interfacing Eclipse to External Data Systems - Importing and Exporting
- Material Code Query
- Missing Snapshot or Dates for Reports in Eclipse Classic
- Order Downloading Options in Eclipse Classic
- Performing Eclipse Classic Automatic Backups
- Performing Eclipse Classic Manual Backups
- Preventative Maintenance Made Easy
- Replacing a Controller / Recovery from a Memory Clear
- Reporting from Archived Data
- Reporting from Archived Data
- Requesting Eclipse Classic Support
- Sending Saved Parameters or Tool Libraries from Eclipse Classic to XL Controller
- Using a Proxy Server
- VLINX ESR901 Converter Installation and Configuration
- Show all articles ( 10 ) Collapse Articles
-
Pathfinder Support
-
- Calibrating the Backgauge - Pathfinder v2
- Calibrating the Machine - Pathfinder v2
- Calibrating the Touchscreen - Pathfinder v2
- Cleaning Controller Screens
- Extracting the Pathfinder SDF from a 5XXX/6XXX Machine
- Installing TeamViewer
- Pathfinder PC Backup/Restore/Import Procedure - Pathfinder v2
- Pathfinder PC BIOS Configuration - 5X00
- Pathfinder PC BIOS Configuration - 6X00
- Solving Memory Loss and Computer Lockup Problems
- XL250BB Backup/Restore Function
-
- FoldGuard Alignment Guide
- FoldGuard Alignment Guide - LZS-2-FG
- FoldGuard Brochure
- FoldGuard Encoder Installation Manual 1-02
- FoldGuard Frequently Asked Questions (FAQ)
- FoldGuard Operation Manual
- FoldGuard System Installation Manual 1-06
- FoldGuard System Installation Manual 1-07
- Laser Distortion Causes and Solutions Manual 1-02
-
MP Series Support
-
- MP300 Series Controller Manual
- MP300CL Series Controller Manual
- MP325 Manual
- MP328 Gripper Manual
- MP328CL Gripper Manual
- MP338 Backgauge Manual
- MP338DH Dual Backgauge Manual
- MP342 Manual
- MP343 Manual
- MP350PFD Manual
- MP450S Installation Guide
- MP465 Installation Guide
- MP465 Operator Manual
- MP465N Operator Manual NTM
-
-
Pathfinder Edge Support
-
- Accessing Pathfinder Edge
- Installing TeamViewer
- Logging into Pathfinder Edge
- Pathfinder Edge - Profile Object Format
- Pathfinder Edge Published API
- Print an Approval or Production Sheet - Edge
- Understanding Settings - Edge
- Using Categories and Subcategories - Edge
- Using the Profile Editor - Edge
- Using the Profile Library - Edge
-
Eclipse Pro Support
- Alert: Eclipse-COMM may be offline
- Alert: Material code XXXXXXXX does not correspond to a known material
- Checking the Status of Eclipse Pro Services
- Connect to Eclipse Pro from a Network Connected Device
- Eclipse Pro Hardware Requirements
- Eclipse Pro Product Sheet
- Eclipse Pro Product Sheet - Spanish
- Eclipse Pro Release Notes
- Eclipse Pro Scheduler
- Eclipse Pro Wallboard Andon App Setup
- Error: "Duplicate material codes. MATERIAL =..."
- Machine Performance Standards
- Nucor Case Study
- Requesting Eclipse Pro Support
- Schedule Sync Table Definition
- Updating Eclipse Pro
- Show all articles ( 1 ) Collapse Articles
-
Accessories Support
-
- 4805-XX and 3805-XX Encoder Cable Comparison
- BRKT-2 Assembly STEP File
- Encoder 10-Turn Test
- Encoder Bracket BRKT-1 Dimensional Drawing
- Encoder Bracket BRKT-2 Assembly Dimensional Drawing
- Encoder Bracket BRKT-2 Dimensional Drawing
- Encoder Brochure
- Encoder Sell Sheet
- Encoder Splitter 6390 Electrical Block Diagram
- Encoder Splitter 6390 Sell Sheet
- Encoder Splitter 6390 Shell STEP File
- Encoder Splitter Module 6390 Guide
- Encoder STEP File
- Encoder Tracking and Mounting
- Encoder Wheel KMW Dimensional Drawing
- Encoder Wheel PMW Dimensional Drawing
- KMW-12 Knurled Encoder Wheel STEP File
- NXXXX Encoder Assembly STEP File
- Scrap Reduction Using Two Encoders
- Troubleshooting Encoder Alignment
- Show all articles ( 5 ) Collapse Articles
-
Legacy Product Support
-
- About the MP401
- Cleaning Controller Screens
- CMP1000 Reference Manual
- CMP11-10 Reference Manual
- CMP12 Reference Manual
- MP100 Reference Manual
- MP101 Reference Manual
- MP101 v2 Reference Manual
- MP103 Reference Manual
- MP103 v3 Reference Manual
- MP237 Reference Manual
- MP257 Reference Manual
- MP37 Reference Manual
- MP38 Reference Manual
- MP39 Reference Manual
- MP401 User Manual
- MP43 Reference Manual
- MP44 Reference Manual
- MP450 Installation Guide
- MP450 Operator Manual
- MP450S Installation and Technical Reference Manual
- MP450S Installation Guide
- MP450S Operator Manual
- MP450Z Operator Manual
- MP46 Reference Manual
- MP465N Operator Manual NTM
- MP54 Reference Manual
- MP55 Reference Manual
- MP550 Operator Manual
- MP56 Reference Manual
- MP57 Reference Manual
- Show all articles ( 16 ) Collapse Articles
-
Eclipse Pro Scheduler
The Scheduler is used to manually download orders to a controller and set up the framework for downloading jobs automatically, at predetermined times, when requested by the machine operator, or when the footage at a controller drops below a specified threshold. In this guide, we will be going over the general navigation, usability, and functionality of the Eclipse Pro Scheduler.
Navigation
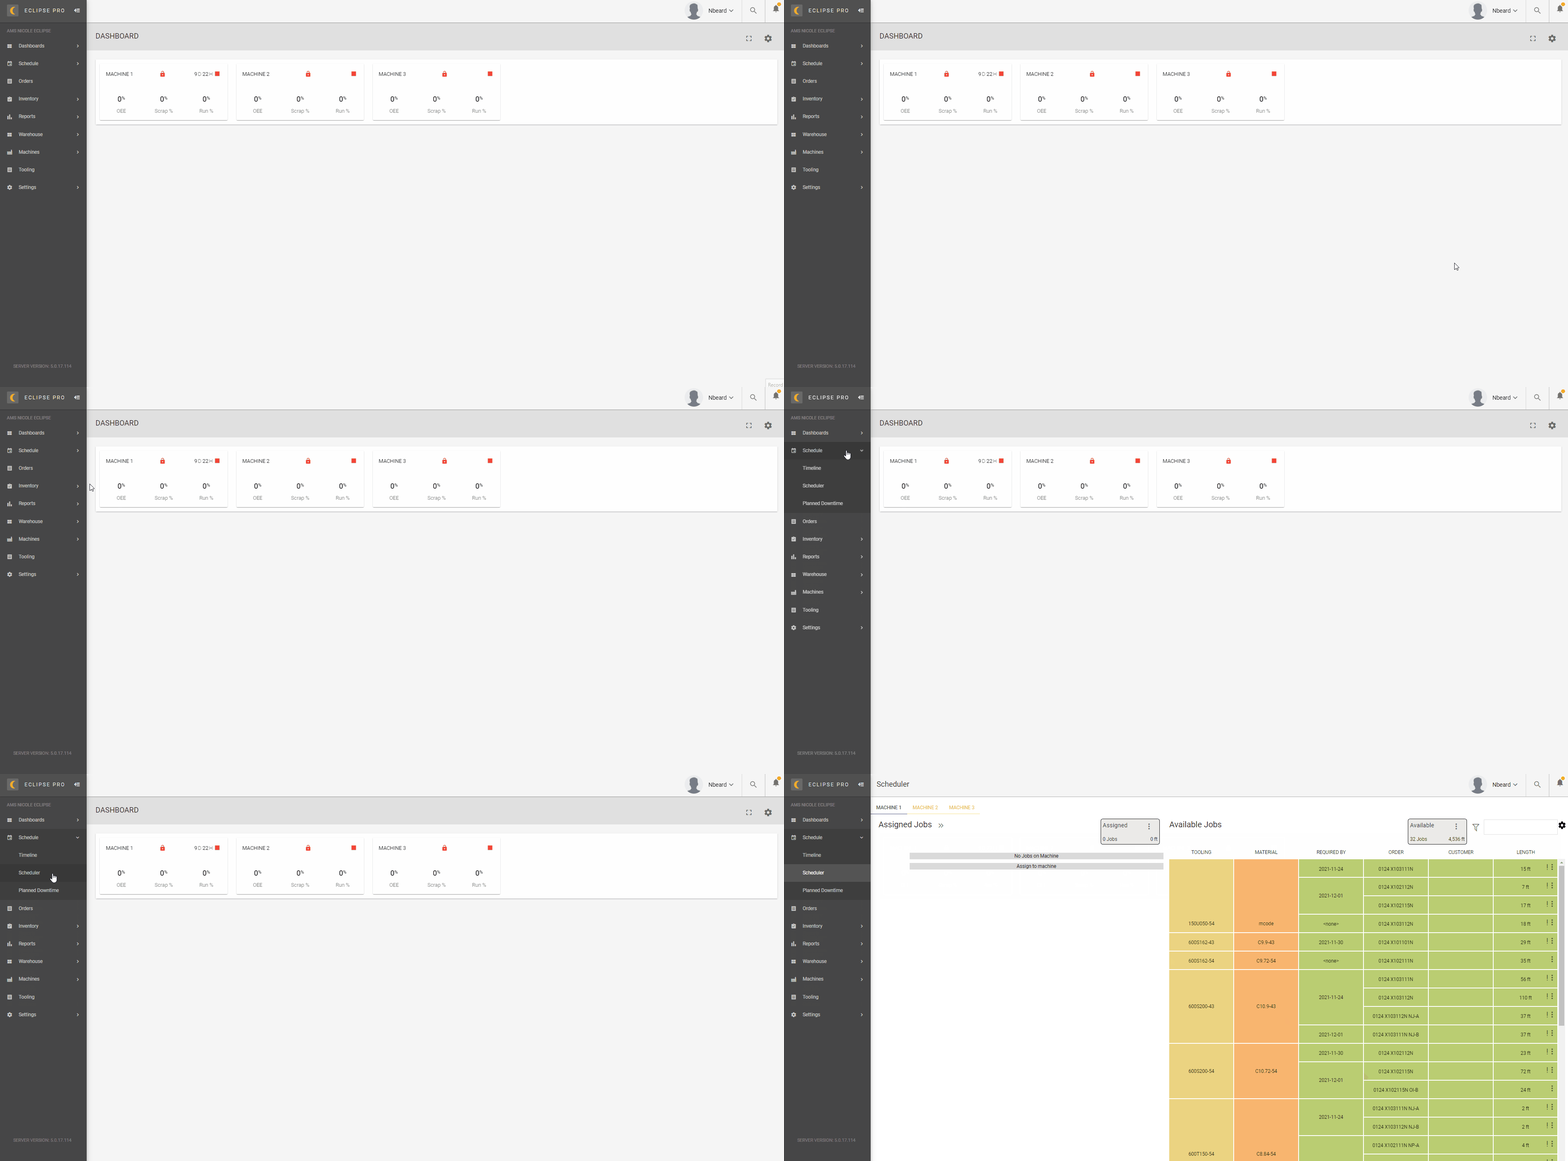
To access the Scheduler, expand the Schedule within the Eclipse Pro navigation pane and then select Scheduler.
Scheduler provides the ability to toggle between the different orders per machine by selecting the machine name in the top left corner.
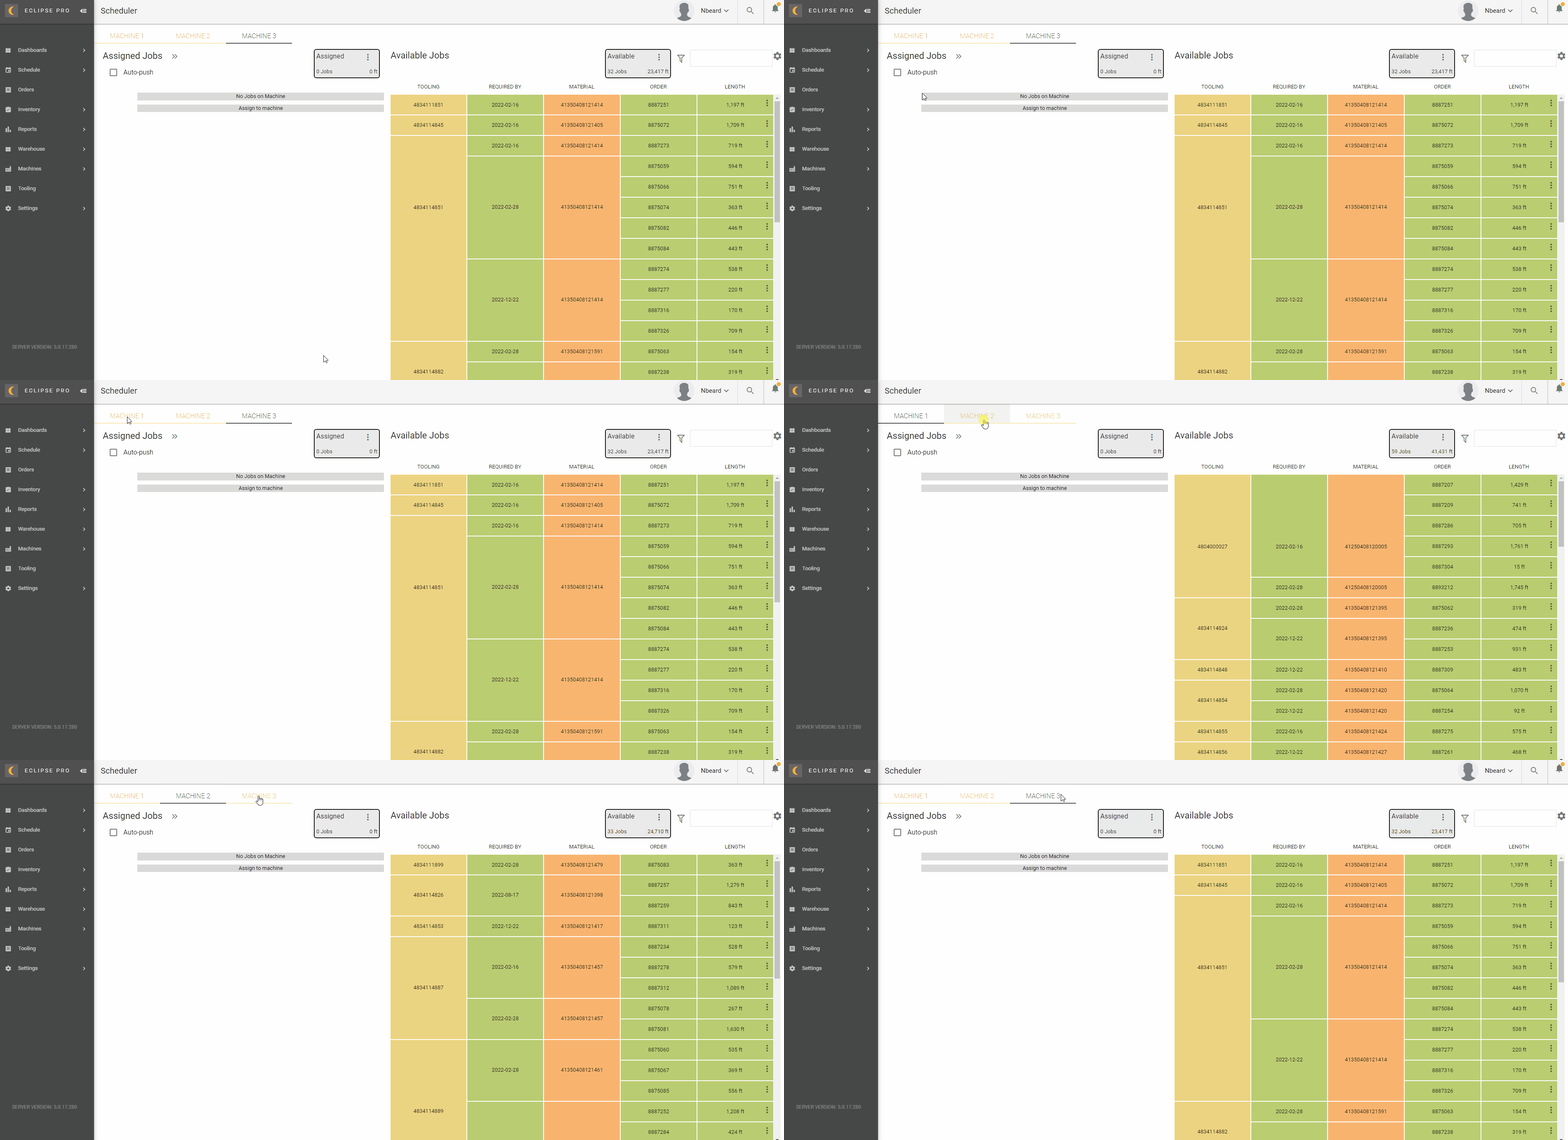
Assigned and Available Jobs
The top section of the Scheduler is separated into two main categories Assigned Jobs and Available Jobs. Assigned jobs are orders currently “On-Machine” as well as jobs that are sequenced and scheduled for production. Available jobs are all orders available for the machine and unscheduled for production on the machine.
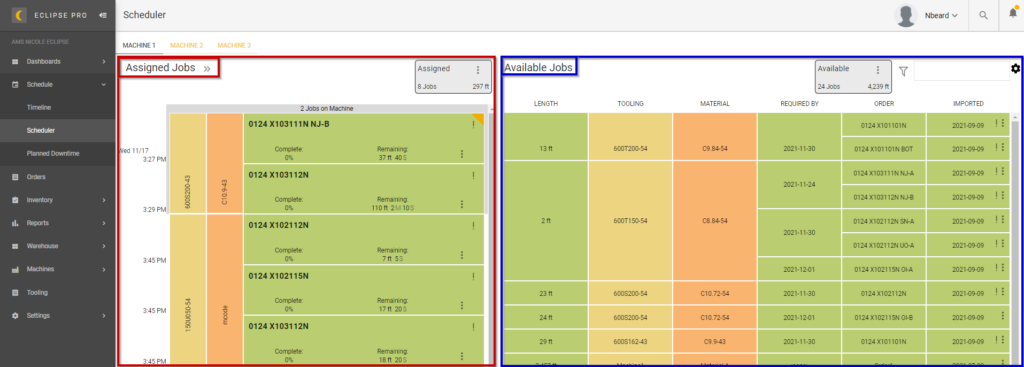
Assigned Jobs
For customers with a large volume of Assigned Jobs, this section can be expanded by selecting the two arrows to the right of Assigned Jobs. This allows for easy accessibility to change an orders sequence or quickly adapt to changes in the production schedule.
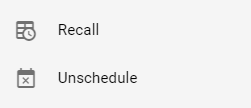
For Jobs that are currently “On Machine”, you have the option to recall an individual job or unschedule.
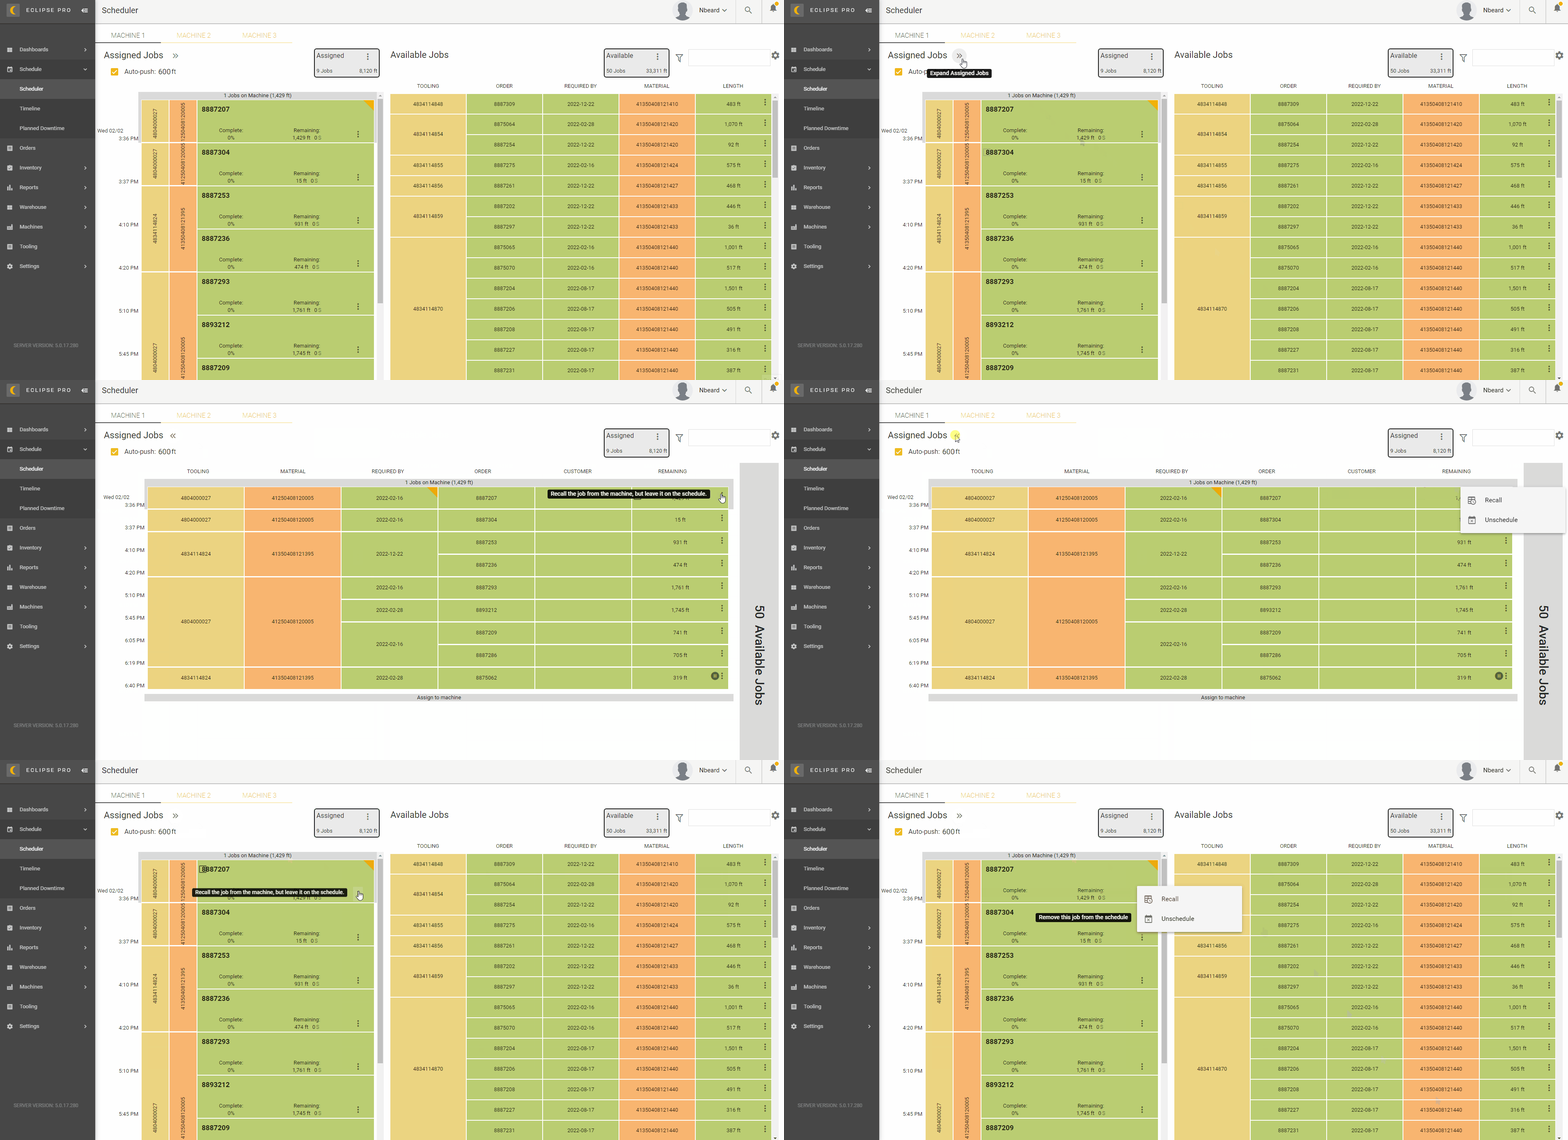
Available Jobs
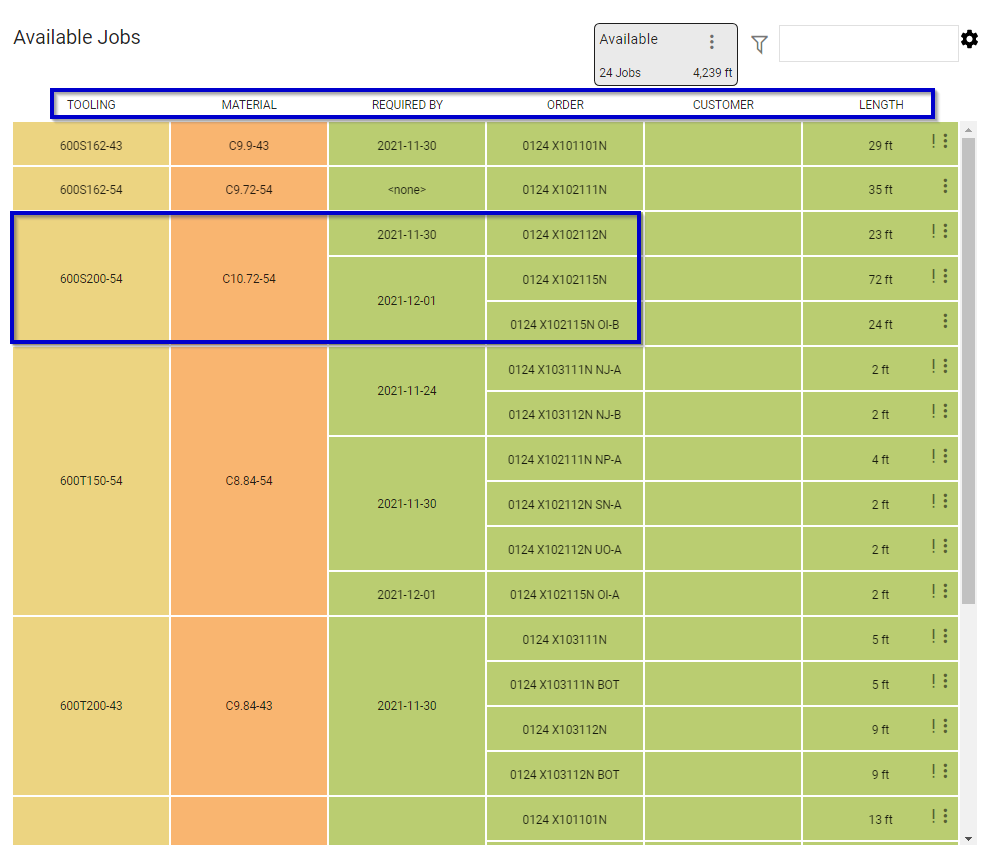
Within available jobs, you are able to see the details of a given job code or order code. By default, item/part length, tooling, material, required by, order, customer, and length of the order are displayed.
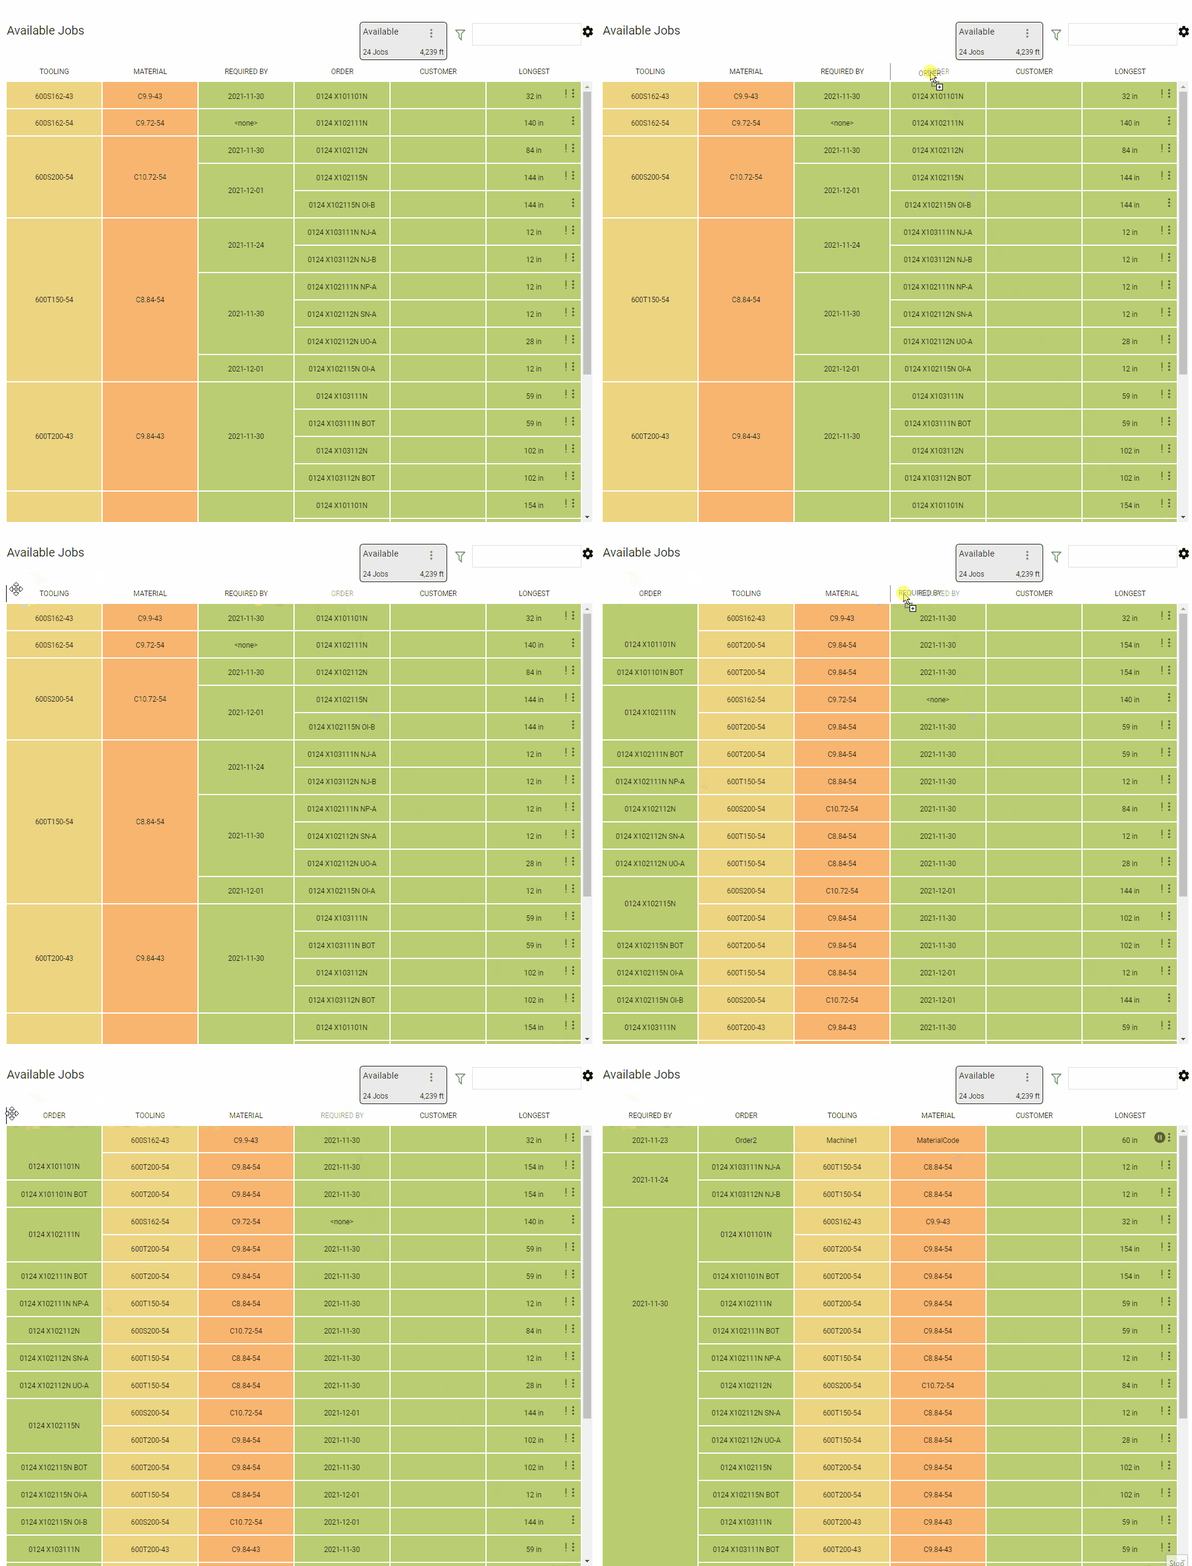
Jobs (Orders) with similar tooling, material, required by, etc. will be grouped together within the display. This display sorts from left to right, meaning that the column in the far left will take precedence when sorting your jobs as opposed to the column to the far right.
You can customize the columns by adding or removing the job order detail columns you would like displayed. This can be done by selecting the gear in the top right-hand corner of the screen.
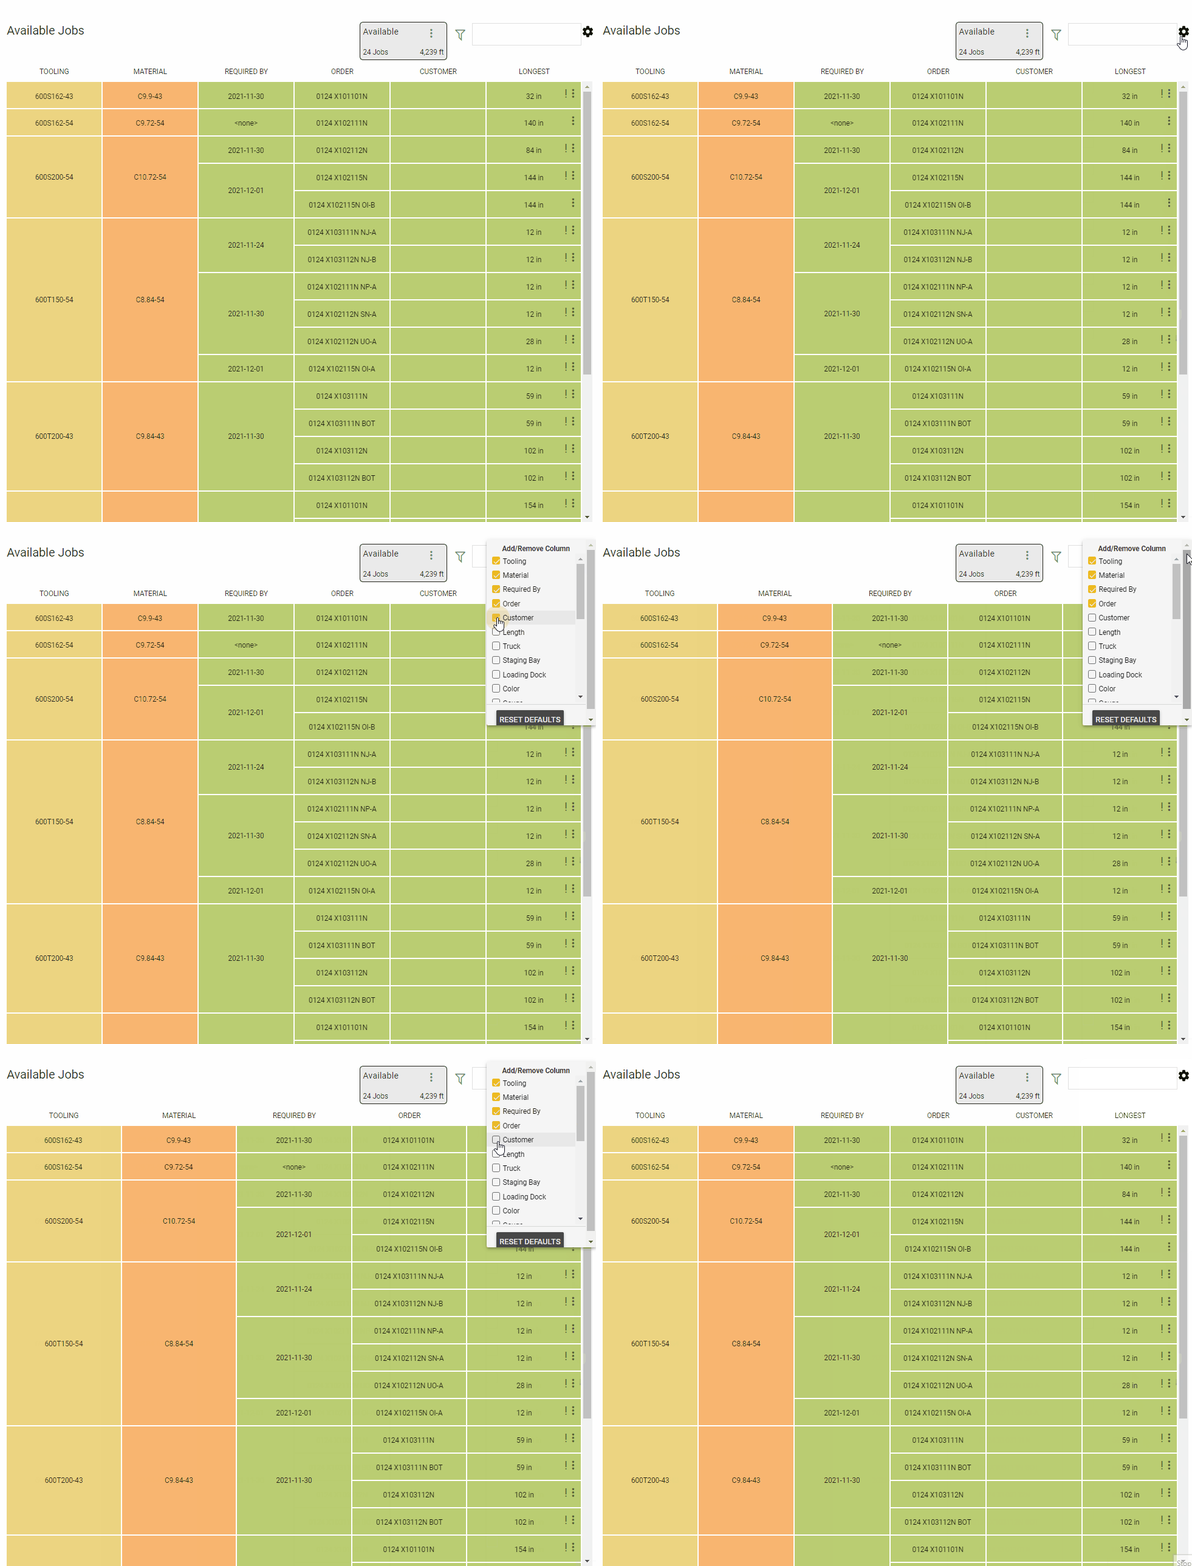
Orders are sorted starting on the far left column. You can customize your sorting by dragging the column to the left or right of the display.
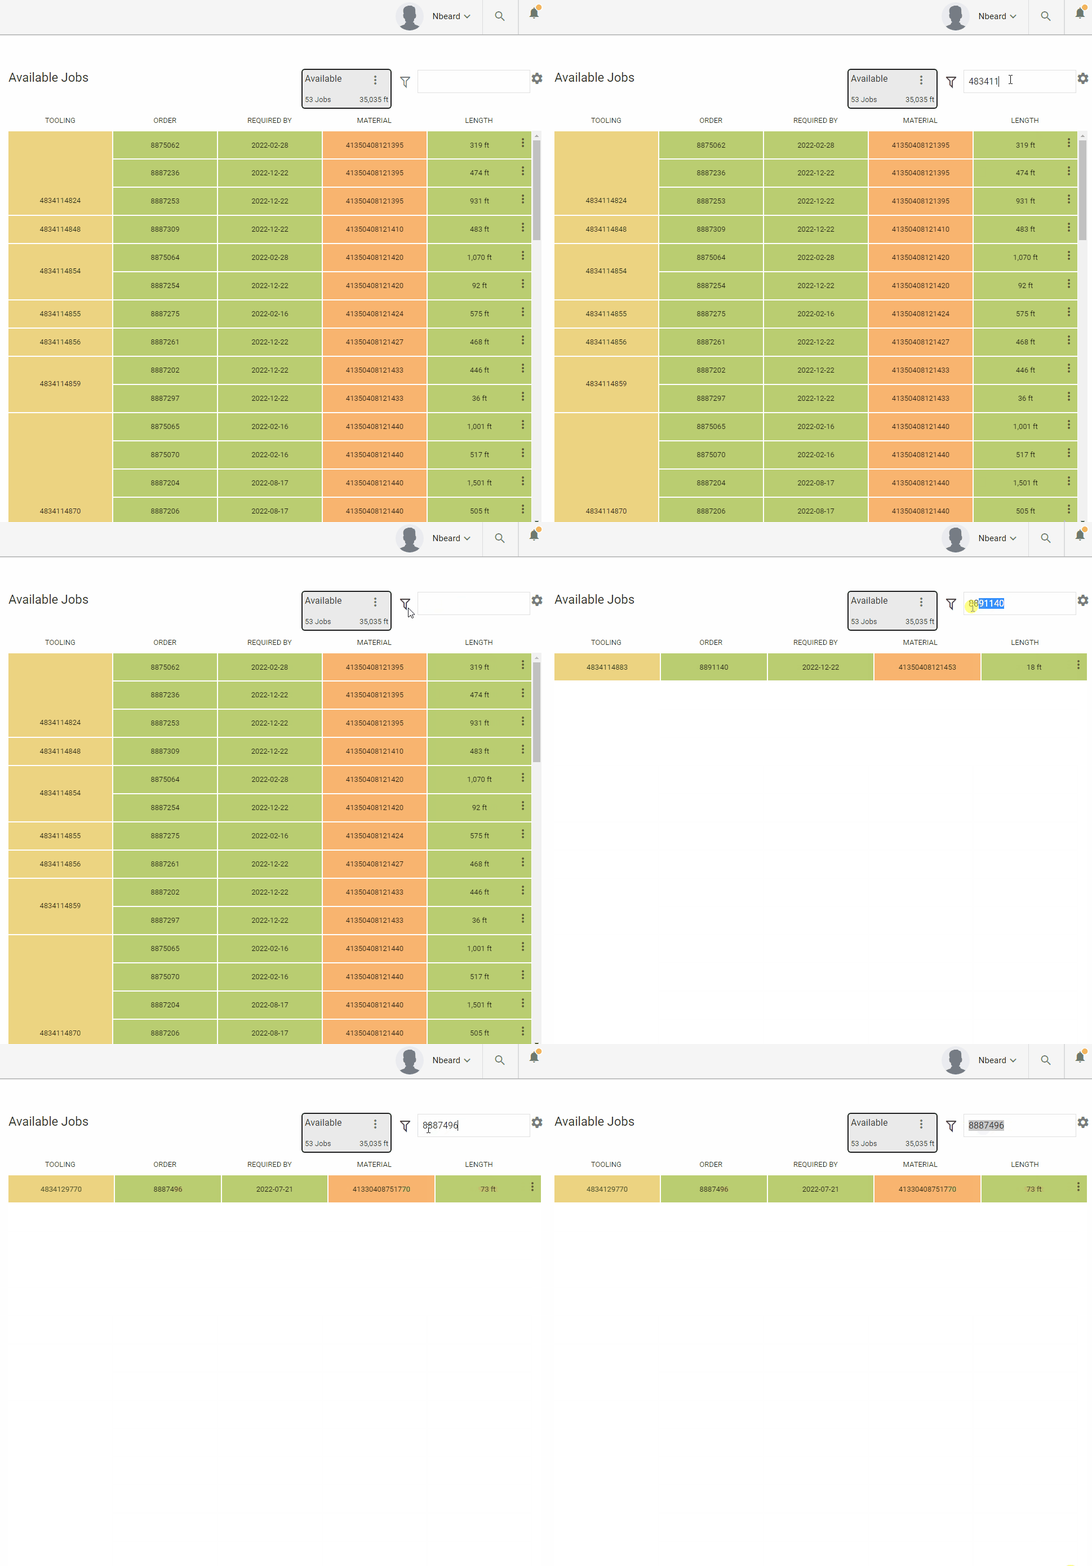
There is also a helpful search function to find a specific job as well as filters that can be applied to quickly find specific available jobs.
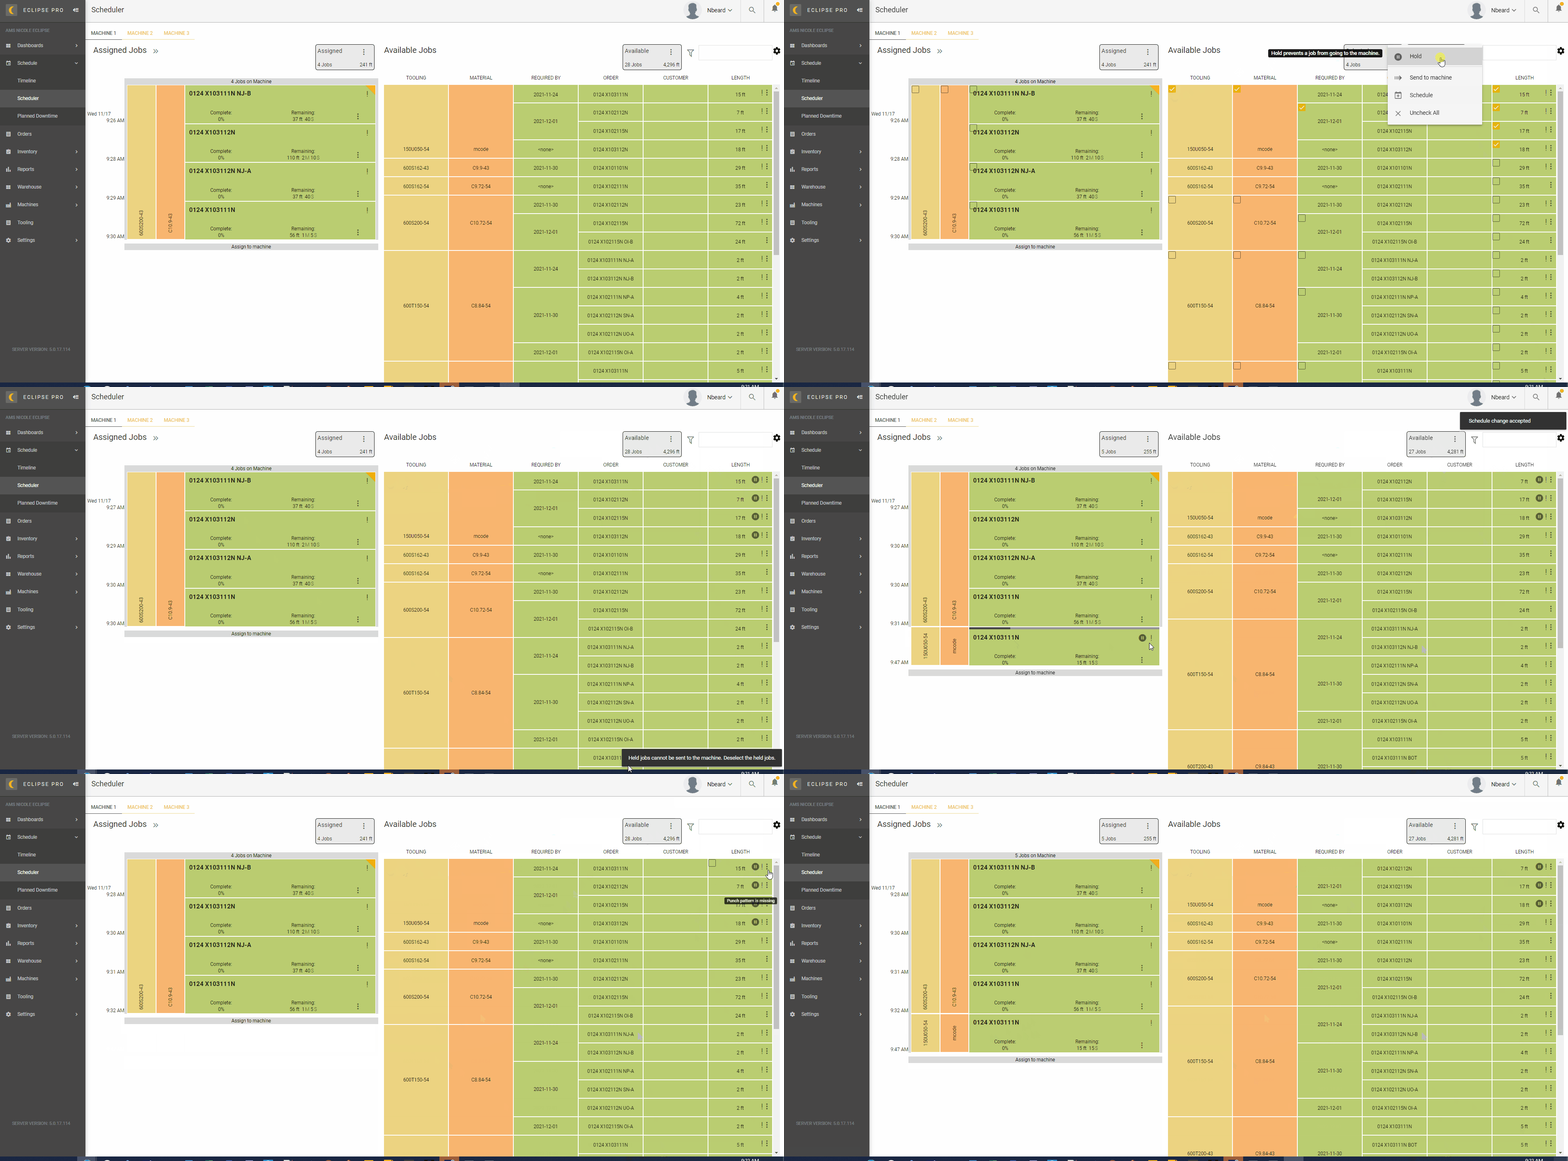
Buttons
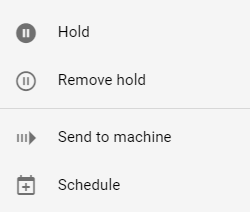
Schedule – Takes the selected jobs and adds them to the end of the schedule.
Send to machine – Immediately downloads the selected jobs to the end of the “On Machine” sequence.
Recall – Recalls the selected jobs from the “On Machine” sequence and places the jobs into the schedule (Assign to machine).
Unschedule – Removes the selected jobs from the schedule and places them back into Available Jobs.
Hold – Sets the selected jobs to an “On hold” status. Jobs with an “on hold” status cannot be sent to the machine, but can still be scheduled.
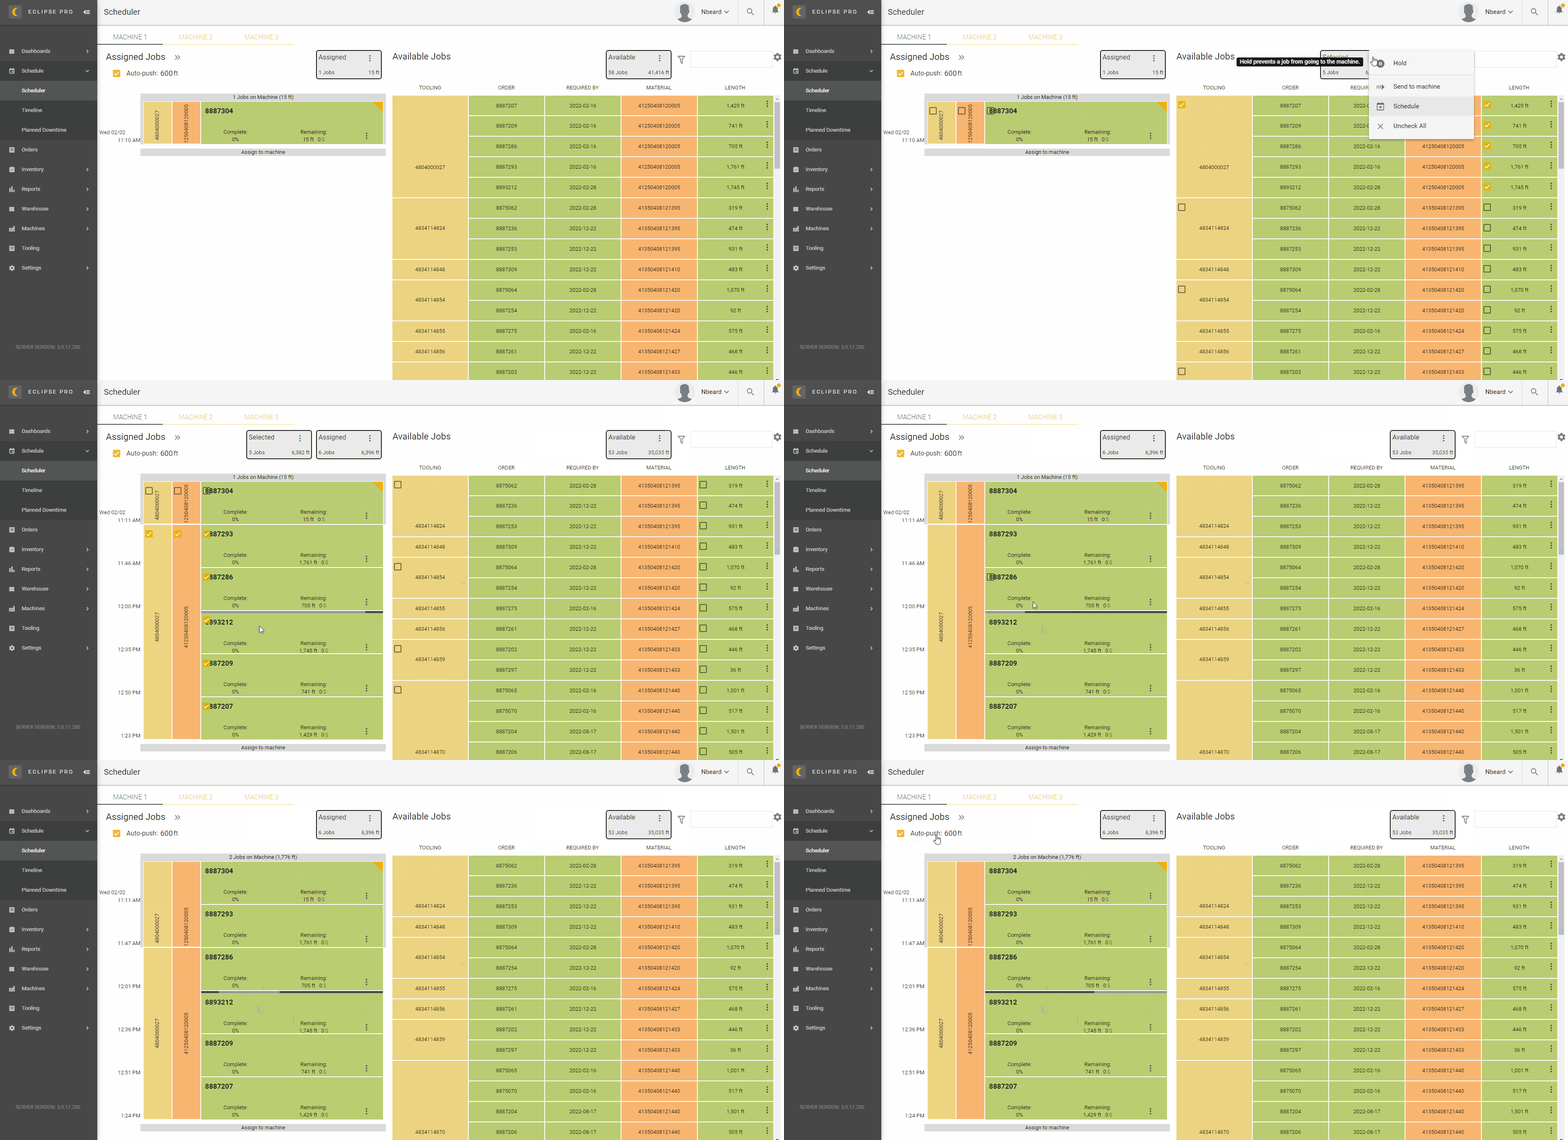
Auto-push – Controls how much lineal footage of orders should be sent to a machine that is running low on scheduled orders. Auto-push footage is configured at a per-machine level.
FAQ
Why are only some of my machines listed in the scheduler?
Depending on your Eclipse Pro licensing, you may only have some of your active machines licensed with the scheduler feature. If you or your company are interested in adding additional lines to your Eclipse Pro license please reach out to support@amscontrols.com.
I see the scheduler available within Eclipse Pro, but everything is blank. My coworker is able to schedule to the machines, but I cannot.
Your Eclipse Pro user account may not have permissions to access the scheduler. Check in with your designated Eclipse Pro administrator and verify that your account has been granted scheduler permissions.
Some of my orders are not appearing within the scheduler for my Machine.
This issue could occur for any number of reasons. Due to multiple variables involved, please reach out to support@amscontrols.com for further assistance.
