Implementing Scrap, Delay, and Employee Codes in Eclipse Classic
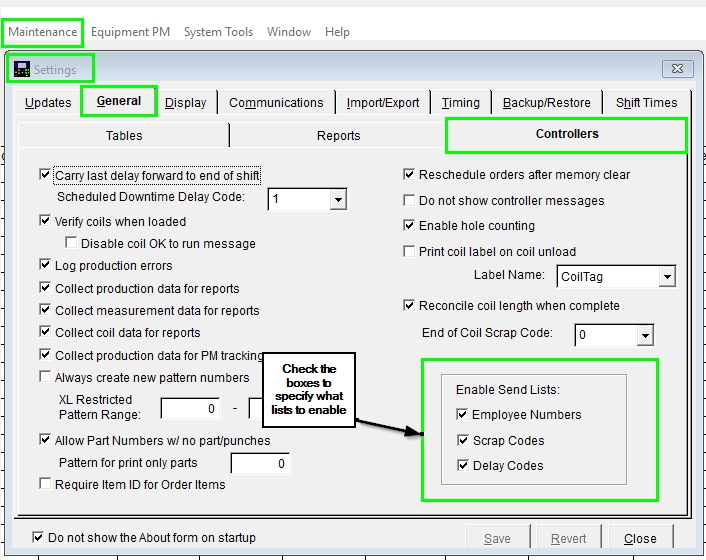
For Scrap, Delay, or Employee Codes, Enable “Send Lists”
Navigate to Maintenance > Settings > General > Controllers:
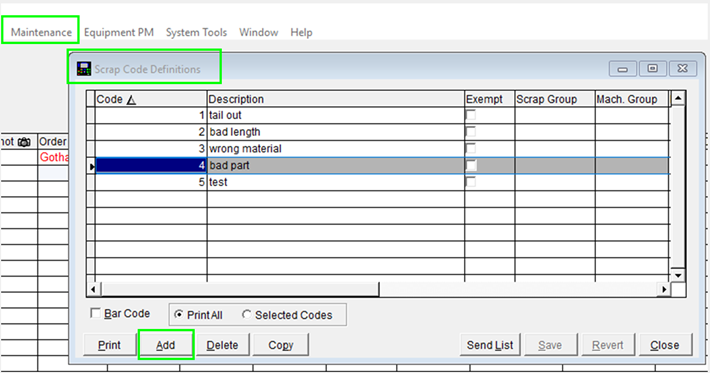
Navigate to the Maintenance Menu and select the Type of Code you want to add: Scrap Code Definitions, Delay Code Definitions, or Employee Code Definitions.
Scrap Code Definitions
In this example, we’re using Scrap Codes.

Select “Add.”
XL series controllers have a variety of features designed to accurately track scrap generated on a machine. These features allow the operator to specify a reason for the scrap. This scrap information is then uploaded to the Eclipse software and can be reviewed through several reports. To simplify recording of scrap, each scrap reason is assigned a unique code.
At the XL controller, the operator can enter the scrap reason using this code. It is also possible to download the entire list of reasons to the controller for viewing by the operator. Instead of entering a code, the operator can pick from a menu of the Scrap Codes. To download this list, Click on the Send List button.
When printing the list of scrap codes, it is possible to print bar codes with each scrap reason. These bar codes can be scanned at the XL controller to automatically consider the current part as scrap and create a new part to make up for it. The scrap reason depends on the bar code scanned. This is the same as pressing the Inc Qty button on the controller, but much faster and less error-prone. To print the list of scrap reasons with bar codes, make sure the Bar Code box is checked before pressing Print.
“Scrap Code Definitions” Column Descriptions Code
The “Code” is the unique, numerical scrap code that is assigned to specific scrap reason as described in the “Description” field. This is programmable from 0 to 99.
Machine Group
Each machine group can have its own set of scrap codes. Leave this blank when the complete set of scrap codes apply to all machines.
Description
This is a basic text description for the scrap reason. This text is what appears on the controller if the scrap list is downloaded to the controller.
Scrap Group
Each scrap reason can be assigned to a scrap group. Some scrap reports may use this grouping to summarize relate scrap reasons.
Exempt
The exempt option is used to indicate scrap reasons that were unavoidable or not controllable. These could include material defects that came from the coil vendor, normal production scrap (trimming off leading edge of a new coil), etc.
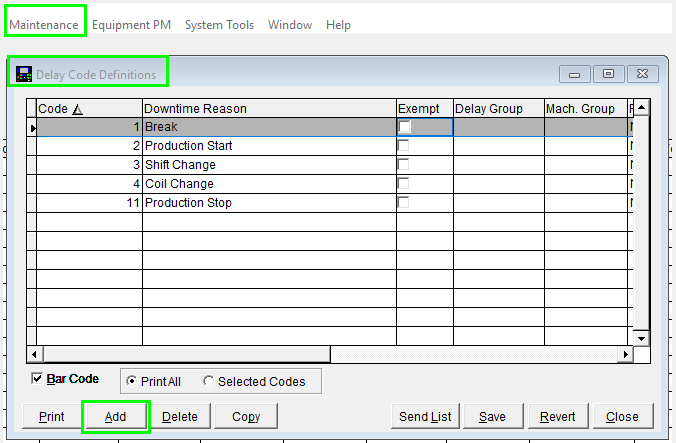
Delay Code Definitions
XL series controllers can be configured to accurately track the reasons for any delays incurred at the machine. Any delays that are longer than a predetermined length of time (set at the XL controller) will require the operator to enter a reason for the delay before the machine can be restarted. This delay information is uploaded to the Eclipse software and can be reviewed through several reports.
To simplify recording of delays, each delay reason is assigned a unique code. At the XL controller, the operator can simply enter the delay reason using this code. It is also possible to download the list of reasons to the controller. Instead of entering a code, the operator can pick from a menu of reasons. To download this list, press the Send List button.
When printing the list of delay codes, it is possible to also print bar codes with each delay reason. These bar codes can be scanned at the XL controller to record the reason for the preceding delay, saving operator entry time and errors. The delay reason will depend on which bar code is scanned. It is possible to scan delay codes for a variety of reasons before restarting the machine.
For example, ten minutes before noon, the current coil is expended. The machine stops and the operator begins to change the coil. At noon, he stops and scans the “Change Coil” code. After a thirty-minute lunch he scans “Lunch Break” and continues loading the coil. Before starting the mill up five minutes later, he scans “Change Coil” again. By following this procedure, he has accurately recorded the reasons for the 45-minute downtime. To print the list of delay reasons with bar codes, make sure the Bar Code box is checked before pressing Print.
“Delay Code” Column Descriptions
Code
The two-digit numeric delay code (0-99). Each of these codes is assigned a specific delay reason that can be displayed or reported on.
Machine Group
Each machinery group may have its own set of delay codes that can be used for summarizing delays.
Description
A text description for the delay. This text will appear on the controller in the “delays” selection list if downloaded to the XL by pressing the “Send List” button.
Delay Group
Each delay reason can be assigned to a delay group. Some delay reports use this grouping to better organize and structure the report forms. Exempt any delays that are expected during a production run should be marked as exempt. This normally includes break time, safety meetings, unscheduled time, etc.
Exempt
Any delays that are expected during a production run should be marked as exempt. This normally includes break time, safety meetings, unscheduled time, etc.
Employee Code Definitions
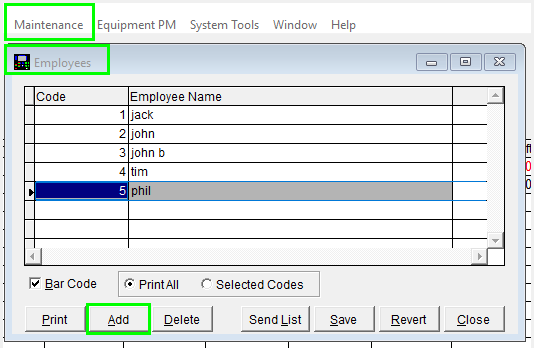
When recording reasons for either run delays or scrap occurrences at the machine, the XL controller also prompts the operator for his/her employee number. The employee number is reported to the Eclipse software with the reason for the delay. Upon inspecting reports, not only will the delay reason be known, but also the operator who entered the delay reason.
As with the scrap and delay codes, it is possible to print out the employee list along with matching bar codes (if your version of Eclipse has this option installed). This will enable and employee to scan in his/her employee number or name quickly and efficiently. With this information, it is possible to create reports that compare the activities and productivity of workers. This can enable an employer to highlight areas where additional training would be helpful.
“Employees” Column Descriptions
Code
This is the employee number (or code) that is assigned to respective employees for tracking and reporting purposes.
Employee Name
This is the employee’s regular name or nickname. This will be selectable from a list at the controller if this feature is enabled.
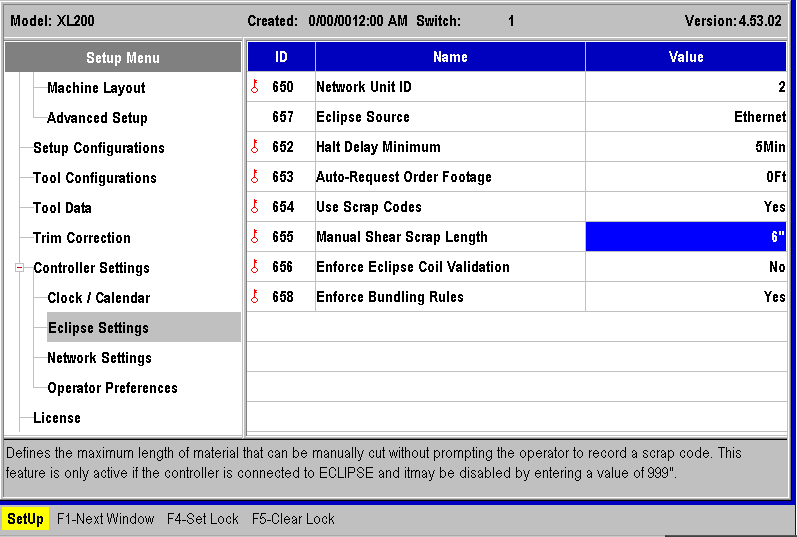
XL200 Settings
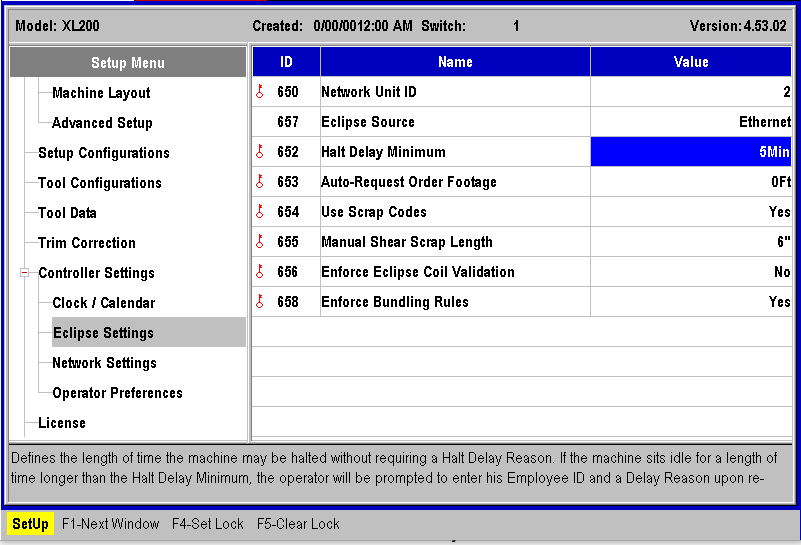
The “652-Halt Delay Minimum” is the length of time that can pass before the Operator is prompted for a Delay Code.
Set “654-Use Scrap Codes” to “Yes.”
The “655-Manual Shear Scrap Length” is the length of material that can be manually cut without prompting for a Scrap Code.