


Using Setup Configurations in the XL200 Series Controller
For many years, customers have asked for multiple copies of a parameter (or parameters) that can be selectively called up when desired. There are many reasons why multiple setup configurations would be desired. One reason for this comes from machines that run different sets of roll tooling. These machines have what are sometimes referred to as cassettes. These cassettes contain the roll tooling, encoders and possibly tail-out sensors. If they have three cassettes, they may have three completely different sets of setup parameters that they have to keep track of – one set of parameters for each cassette.
We have now added the ability for the customer to decide which parameters they want multiple copies of. Each of these parameters can be saved in what we will call a “Configuration.” The customer can create up to 255 Configurations. Each Configuration will have a separate copy of the parameters the customer has indicated they want in their configurations.
Models Available
- All Models
Versions Available
- XL2OL v3 – v3.45.00 or higher
- XL2CL v3 – V3.45.00 or higher
- XL2OL v4 – v4.08.00 or higher
- XL2CL v4 – v4.08.00 or higher
- XL220OL v4 – v4.04.00 or higher
In order to create and use these Configurations, there are few steps the programmer/operator must take. Below is a step-by-step guide to creating and using these configurations.
Step 1 – Selecting Parameters for the Configurations
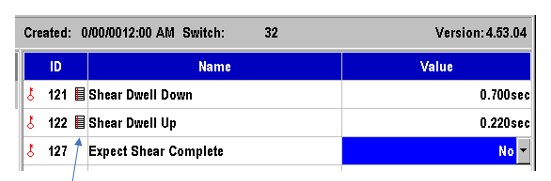
To get started, we must choose which parameters we want to have available in our setup Configuration lists. This is done to keep the setup lists much smaller and manageable. New parameters can be added to the list at any time and the lists are universal, which means every Configuration we create will have the same list of parameters available for editing. Parameters that have been added to your Configurations are marked with a small notepad symbol next to the parameter like this:
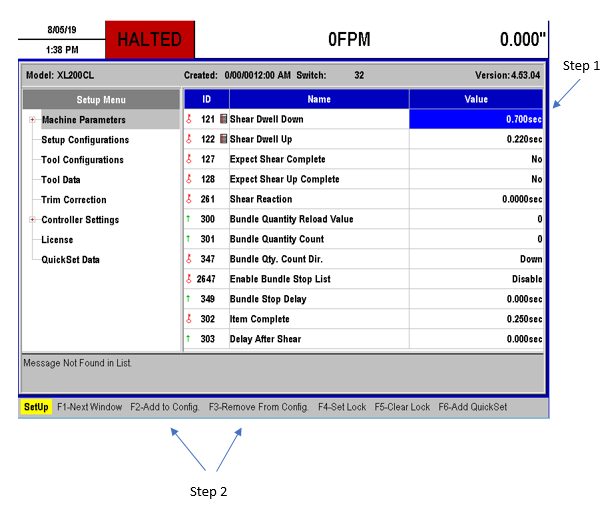
You can add or remove parameters by following the steps below:
- Highlight the parameter you wish to add or remove.
- Press F2 to add this parameter or Press F3 to remove this parameter.
Step 2 – Create Configurations
Now that we have the parameters chosen to be used in our Configurations, we need to create the Configurations themselves. In other words, we are creating the number of setup lists available to choose from.
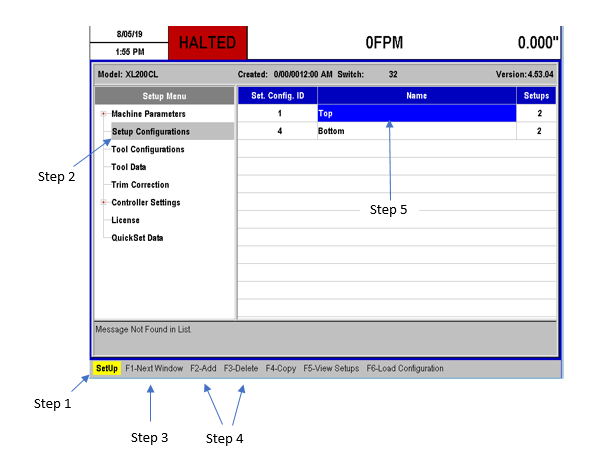
You can create a Configuration by doing the following:
- Press the Setup button on the keypad.
- Highlight “Setup Configurations” on the left navigation pane.
- Press F1 to jump to the right navigation pane or simply touch there on the screen.
- Press F2 to add a new Configuration or F3 to
delete a Configuration.
- Note: When adding a new Configuration, a new number will automatically be assigned for the Set. Config. ID. You can rename this by editing the field, but it is recommended to keep this default.
- Name the Configuration by editing the name field. Only 9 characters are available and are alphanumeric. If you wish to use letters, then you must first turn on the virtual keypad in your operator preferences.
- Repeat for the number of Configurations you want.
Step 3 – Edit Parameters within the Configuration
Once Configurations have been created, we can go into each Configuration and edit the parameters within that Configuration to be loaded. Please keep in mind, editing a parameter from the main “Machine Parameter” list has no effect on these lists. If you want to change the value of a parameter within this list, you MUST manually change it from the Configuration list.
Note: NEW for XL2OL and XL2CL v4.63.00 and higher as well as XL220 v4.16.00 and higher
Edits to setup parameters that are part of Setup Configurations can now automatically be saved into the currently selected configuration. A new Setup has been added for backwards compatibility. The new setup is called “Save Setup Edits to Configuration.” It defaults to No, which results in no changes to the controller operation. If the user determines that they would like their edits to configuration parameters to be saved in the configuration they can set it to Yes.
When set to Yes, the values of the configuration parameters will be saved in the current configuration just before loading a new configuration. The new setup can be found in the “Operator Preferences” setup group.
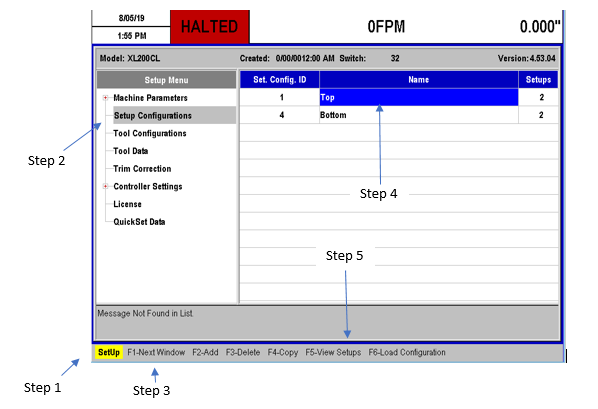
You can edit parameter values within a Configuration by doing the following:
- Press the Setup button on the keypad.
- Highlight “Setup Configurations” on the left navigation pane.
- Press F1 to jump to the right navigation pane or simply touch there on the screen.
- Highlight the Configuration list you want to edit.
- Press F5 to View Setups.
- Edit the parameters you wish to change.
Step 4 – Loading a Configuration
There are three different ways of loading a Configuration to be used. Configurations can be automatically loaded via a Product Code, manually loaded by the operator, or selected to be loaded by the PLC using Modbus.
In the section below we will discuss the process for loading via Product Code as well as the manual process of loading a Configuration. We will not discuss the PLC option as that is described in the “Modbus Communication Specification” document and should only be attempted by AMS Engineers or Software Engineers familiar with PLC programming.
Automatic Loading of a Configuration via Product Code
It is possible to have the controller automatically load specific Configuration when a Product Code is called out to be run with an order. Please see the Xl200 Series Controller manual for more information about Product Codes and how they are used.
In order to enable this feature, you must first locate the parameter “ID 711 – Enforce Configuration By PCode” and set it to Yes. This can be found by doing the following:
- Press Setup.
- Highlight Controller Settings in the left navigation pane.
- Expand the list by pressing the Right arrow key on the keypad.
- Highlight Operator Preferences.
- The parameter will be listed on the right. Set this to Yes.
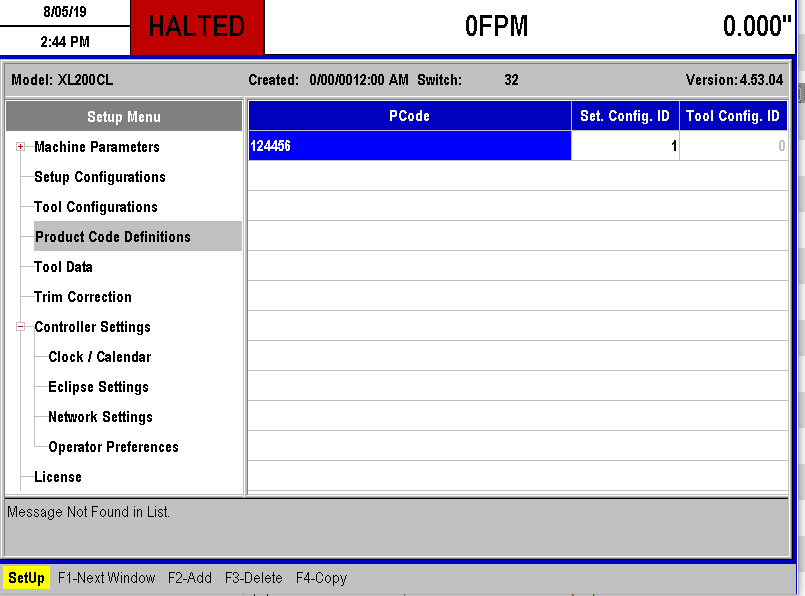
Now that this feature is enabled, we can link a Configuration to a Product Code. To do this, follow these steps:
- Press Setup.
- Highlight Product Code Definitions in the left navigation pane.
- Press F1 to jump to the right navigation pane or simply touch there on the screen.
- Press F2 to Add or F3 to Delete.
- Enter the Product Code you wish to link and Press Enter.
- Enter the Configuration ID you wish to load with that Product Code and press Enter.
Manual Loading of a Configuration from the Menu
An operator may choose to manually load a specific Configuration for a machine setup or instance of their choosing. This is a quick process but not a desirable one as it requires an operator to remember to do this, although it is still better than manually changing an entire list of parameters.
To manually load a configuration, perform the following steps:
- Press Setup.
- Highlight Setup Configurations in the left navigation pane.
- Press F1 to jump to the right navigation pane or simply touch there on the screen.
- Highlight the Configuration you wish to load.
- Press F6 to load the Configuration.
- A dialog box will appear to confirm you want to load that Configuration. Choose Yes to load this.
