


-
Technical Support
-
- A Case for Computer Integrated Manufacturing (CIM)
- Basic Methods of Length Control
- Benefits of Computer Integrated Manufacturing (CIM) - Deutsch
- Coil Handling
- Continuous Improvement - Tube & Pipe Journal
- Continuous Improvement in Roll Forming
- Encoder Tracking and Mounting
- Improving Roll Forming Operations
- Part Marking
- Roll Forming and Industry 4.0
- Roll Forming: The Four Basic Machine Types
- Servo Control for Improving Roll Formed Production
-
-
XL200 Series Support
-
- Battery Replacement
- Calibrating the Touchscreen of an XL200 Controller
- Extending XL200 Controls with PLC Integration
- Solving Memory Loss and Computer Lockup Problems
- Using Product Codes for Machine Positioning in the XL200 Series Controller
- Using Setup Configurations in the XL200 Series Controller
- Using Tool Configurations in the XL200 Series Controller
- XL200 Direct Ethernet Communication with Eclipse Classic
-
- Bar Code Scanners
- Bar Code Scanners for Data Entry
- Boosted Dies
- Calculating Press Reaction
- Checking Press Consistency with Oscilloscopes
- DIP Switch Configuration
- Punch Programming on the XL200
- Sending Saved Parameters or Tool Libraries from Eclipse Classic to XL Controller
- Understanding the XL200 Part Queue
- Using Product Codes for Machine Positioning in the XL200 Series Controller
- Using Setup Configurations in the XL200 Series Controller
- Using the Stitching Feature
- Using Tool Configurations in the XL200 Series Controller
- XL200 Error Codes
- XL200 Parameters
-
- BOSS Shear
- Brake & Hump - XL200CLU
- Calculating Press Reaction
- Checking Press Consistency with Oscilloscopes
- Closed Loop Flying Die / Die Accelerator
- Closed Loop Stopping
- Coil End Point
- Extending XL200 Controls with PLC Integration
- Open Loop Flying Die
- Open Loop Stopping / Feed-to-Stop
- Tailout Sensor
-
Eclipse Pro Support
- Alert: Eclipse-COMM may be offline
- Alert: Material code XXXXXXXX does not correspond to a known material
- Checking the Status of Eclipse Pro Services
- Connect to Eclipse Pro from a Network Connected Device
- Eclipse Pro Hardware Requirements
- Eclipse Pro Product Sheet
- Eclipse Pro Product Sheet - Spanish
- Eclipse Pro Release Notes
- Eclipse Pro Scheduler
- Eclipse Pro Wallboard Andon App Setup
- Error: "Duplicate material codes. MATERIAL =..."
- Machine Performance Standards
- Nucor Case Study
- Requesting Eclipse Pro Support
- Schedule Sync Table Definition
- Updating Eclipse Pro
- Show all articles ( 1 ) Collapse Articles
-
Eclipse Support
-
- A Case for Computer Integrated Manufacturing (CIM)
- Benefits of Computer Integrated Manufacturing (CIM) - Deutsch
- Coil Inventory Management with CIM
- Improving Production Capacity with Computer Integrated Manufacturing (CIM)
- Mistakes Happen! CIM for Mistake Prevention in Roll Forming
- Roll Forming and Industry 4.0
- The Quality Gap
-
- Automatically Starting Eclipse Classic
- Cable Specifications for RS Communication
- Coil Validation
- Creating an Eclipse Classic Package File
- Deleting Done Orders in Eclipse Classic
- Eclipse Classic Hardware Requirements
- Eclipse Classic Permissions - XLSecurity.exe
- Eclipse Connections
- Eclipse Data Exchange Options
- Establishing Communication with Eclipse
- Implementing Scrap, Delay, and Employee Codes in Eclipse Classic
- Interfacing Eclipse to External Data Systems - Importing and Exporting
- Material Code Query
- Missing Snapshot or Dates for Reports in Eclipse Classic
- Order Downloading Options in Eclipse Classic
- Performing Eclipse Classic Automatic Backups
- Performing Eclipse Classic Manual Backups
- Preventative Maintenance Made Easy
- Replacing a Controller / Recovery from a Memory Clear
- Reporting from Archived Data
- Reporting from Archived Data
- Requesting Eclipse Classic Support
- Sending Saved Parameters or Tool Libraries from Eclipse Classic to XL Controller
- Using a Proxy Server
- VLINX ESR901 Converter Installation and Configuration
- Show all articles ( 10 ) Collapse Articles
-
Pathfinder Support
-
- Calibrating the Backgauge - Pathfinder v2
- Calibrating the Machine - Pathfinder v2
- Calibrating the Touchscreen - Pathfinder v2
- Cleaning Controller Screens
- Extracting the Pathfinder SDF from a 5XXX/6XXX Machine
- Installing TeamViewer
- Pathfinder PC Backup/Restore/Import Procedure - Pathfinder v2
- Pathfinder PC BIOS Configuration - 5X00
- Pathfinder PC BIOS Configuration - 6X00
- Solving Memory Loss and Computer Lockup Problems
- XL250BB Backup/Restore Function
-
- FoldGuard Alignment Guide
- FoldGuard Alignment Guide - LZS-2-FG
- FoldGuard Brochure
- FoldGuard Encoder Installation Manual 1-02
- FoldGuard Frequently Asked Questions (FAQ)
- FoldGuard Operation Manual
- FoldGuard System Installation Manual 1-06
- FoldGuard System Installation Manual 1-07
- Laser Distortion Causes and Solutions Manual 1-02
-
Pathfinder Edge Support
-
- Accessing Pathfinder Edge
- Installing TeamViewer
- Logging into Pathfinder Edge
- Pathfinder Edge - Profile Object Format
- Pathfinder Edge Published API
- Print an Approval or Production Sheet - Edge
- Understanding Settings - Edge
- Using Categories and Subcategories - Edge
- Using the Profile Editor - Edge
- Using the Profile Library - Edge
-
Accessories Support
-
- Indraworks DS Tuning Procedure (Analog) for CSB02_1 Control Sections
- Indraworks DS Tuning Procedure (Analog) for HCS01_1E Cs Servo Drives
- IndraWorks DS Tuning Procedure (EtherCAT) for CSB02_1 Control Sections
- IndraWorks DS Tuning Procedure (EtherCAT) for HCS01_1 Drives
- Indraworks DS Tuning Procedure (SERCOS II) for CSB01.1 Control Sections
-
MP Series Support
-
- MP300 Series Controller Manual
- MP300CL Series Controller Manual
- MP325 Manual
- MP328 Gripper Manual
- MP328CL Gripper Manual
- MP338 Backgauge Manual
- MP338DH Dual Backgauge Manual
- MP342 Manual
- MP343 Manual
- MP350PFD Manual
- MP450S Installation Guide
- MP465 Installation Guide
- MP465 Operator Manual
- MP465N Operator Manual NTM
-
-
Legacy Product Support
-
- About the MP401
- Cleaning Controller Screens
- CMP1000 Reference Manual
- CMP11-10 Reference Manual
- CMP12 Reference Manual
- MP100 Reference Manual
- MP101 Reference Manual
- MP101 v2 Reference Manual
- MP103 Reference Manual
- MP103 v3 Reference Manual
- MP237 Reference Manual
- MP257 Reference Manual
- MP37 Reference Manual
- MP38 Reference Manual
- MP39 Reference Manual
- MP401 User Manual
- MP43 Reference Manual
- MP44 Reference Manual
- MP450 Installation Guide
- MP450 Operator Manual
- MP450S Installation and Technical Reference Manual
- MP450S Installation Guide
- MP450S Operator Manual
- MP450Z Operator Manual
- MP46 Reference Manual
- MP465N Operator Manual NTM
- MP54 Reference Manual
- MP55 Reference Manual
- MP550 Operator Manual
- MP56 Reference Manual
- MP57 Reference Manual
- Show all articles ( 16 ) Collapse Articles
-
Establishing Communication with Eclipse
Step 1: Push the SET UP button on the bottom right side of the XL200.
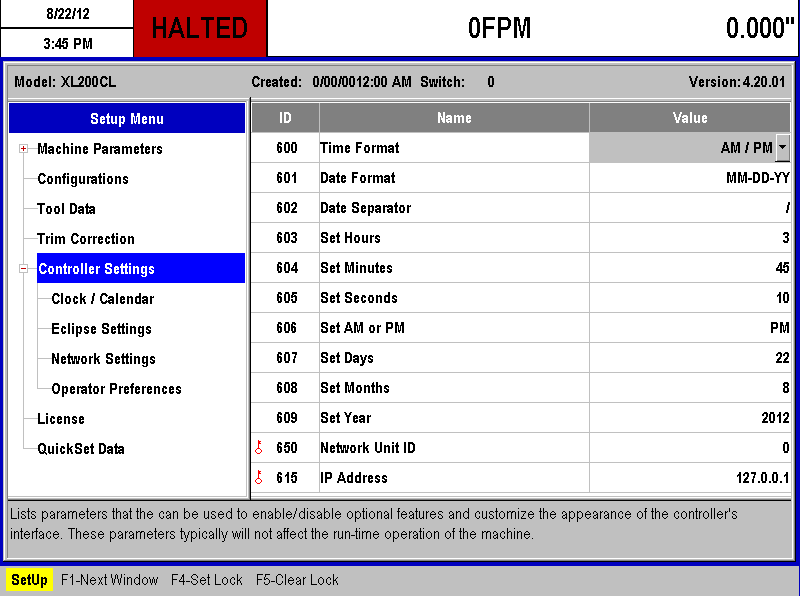
Figure 1 – (+) sign pushed on Controller Settings.
Step 2: In the left hand column, push the (+) sign next to controller settings as shown in figure 1, the + will become a (-) sign.
Step 3: Push Eclipse Settings.
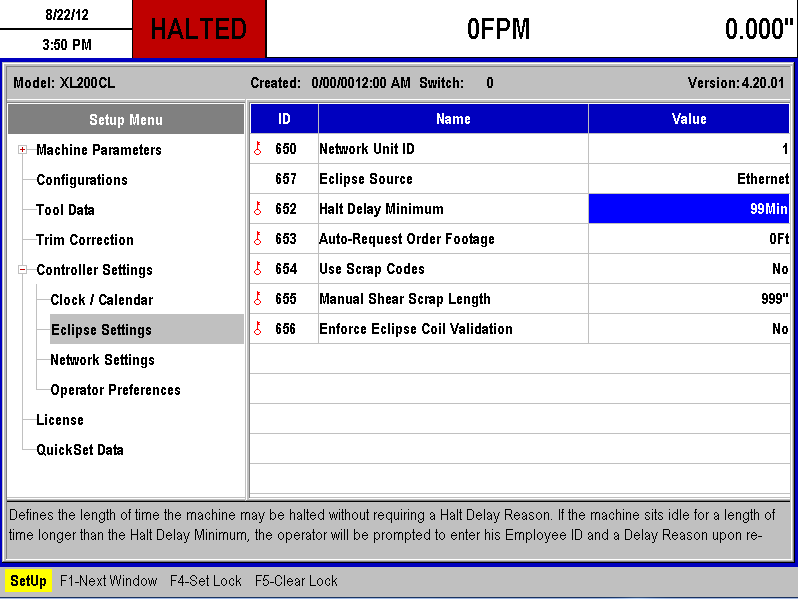
Figure 2 – Eclipse settings configured.
Step 4: Select a Network Unit ID by highlighting the number and pushing a number on the keypad, besides 0, this is the new Network Unit ID.
Step 5: Select Eclipse Source and select Ethernet from the drop down menu. The screen should look like Figure 2.
Step 6: Select Network Settings.
Step 7: Enter an IP Address that is compatible with your network.
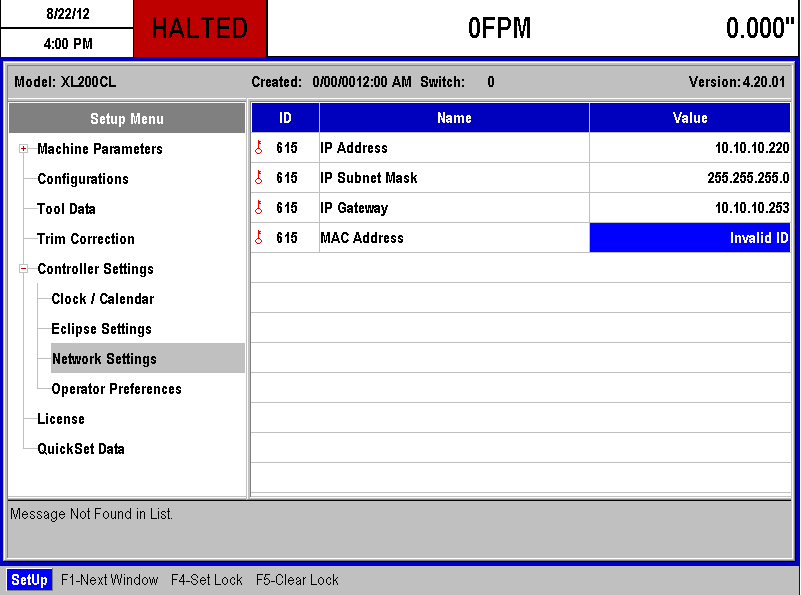
Figure 3 – Network settings configured.
Step 8: Set the IP Subnet Mask and the IP Gateway to the same numbers as your network as shown in Figure 3.
Step 9: Open Eclipse.
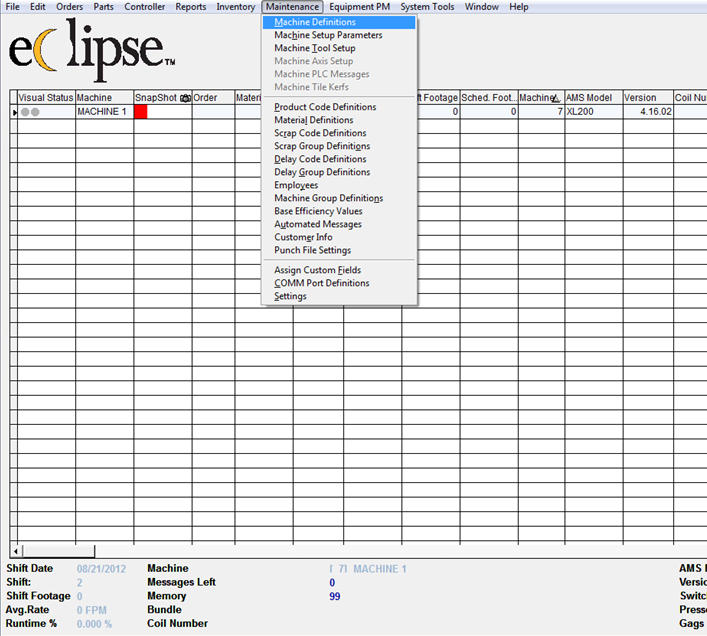
Figure 4 – Eclipse, Maintenance, Machine Definitions.
Step 10: Open the dropdown menu Maintenance and click Machine Definitions as shown in Figure 4.
Step 11: Change the Machine Number to match the Network Unit ID that is entered in the controller.
Step 12: Set the COMM Port to Ethernet via the dropdown menu.
Step 13: Enter the IP Address that is entered into the controller.
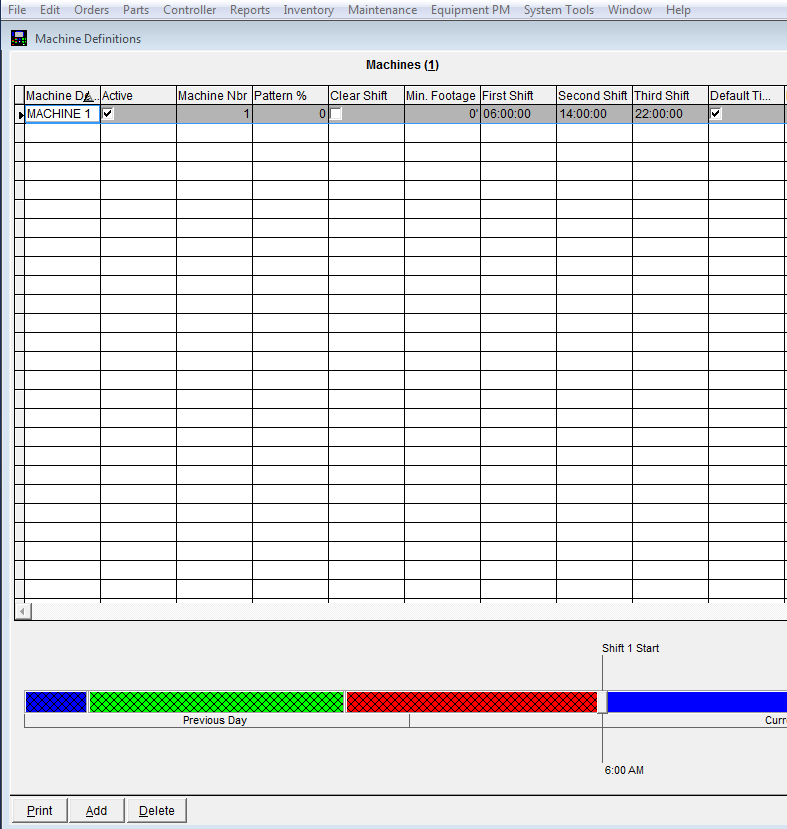
Figure 5 – Machine Definitions Window (left side).
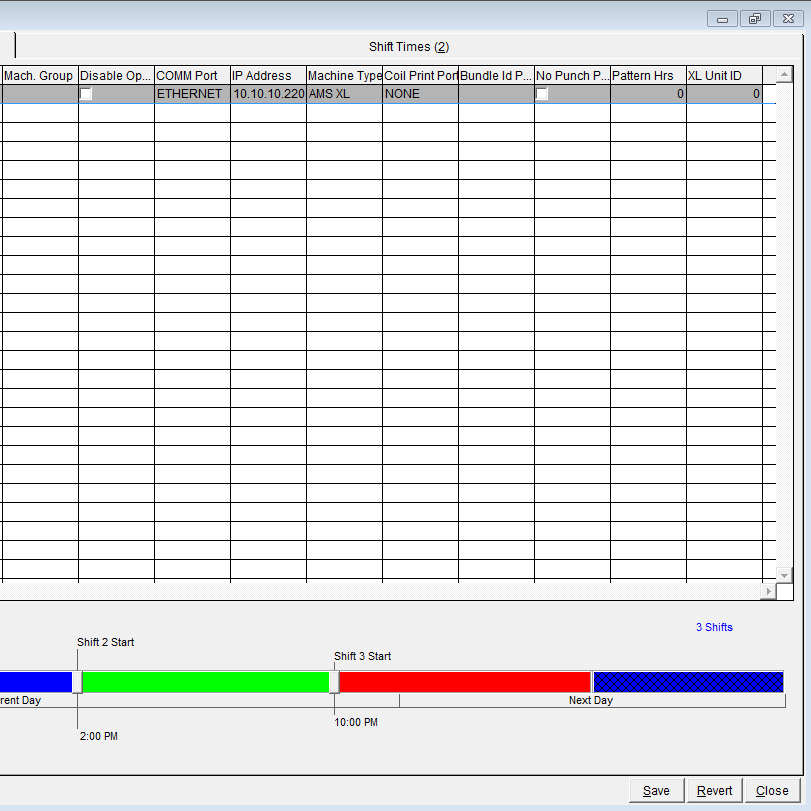
Figure 6 – Machine Definitions Window (right side).
Step 14: Change the Machine Type to AMS XL via the dropdown menu as shown in Figure 5 and Figure 6.
Step 15: Click Save in the bottom right corner. Click Apply to the pop-up that appears. Click Close in the bottom right corner.
Step 16: On the main Eclipse screen push the START ECLIPSE-COMM button in the top right corner. This may take a moment to connect.
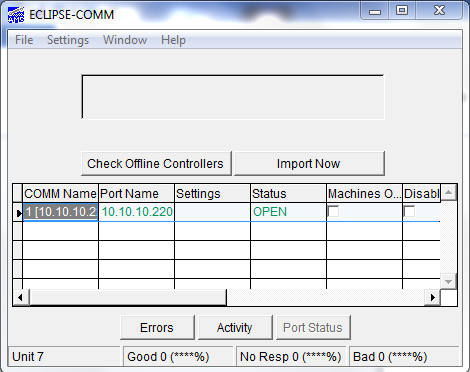
Figure 7 – Eclipse-Comm window.
Step 17: Once the ECLIPSE-COMM pop-up opens, push the Port Status button on the bottom right of the pop-up. Under Status it should read OPEN in green letters as shown in Figure 7.
Note: This window can be minimized but not closed. If this window is closed ECLIPSE-COMM will be terminated.
KB-01033-T4WY
