Using Product Codes for Machine Positioning in the XL200 Series Controller
The XL200 Controller supports various methods for positioning axis based on many different criteria. For this document, we will be focusing on the method of positioning machine Axes based on a programmed product code. Using this method, it is possible to store machine axis positions and link them to a product code. When that particular product code is required in the XL200 Series Controller, the operator can load the specific positions, the positions are sent to devices responsible for positioning these Axes. Once in the respective devices report back that the Axes are in position, the machine is allowed to run.
There are many uses for this feature including, but not limited to:
- Material Guides
- Roll Form Tooling
- Various Machine Setups
The XL200 Series Controller can sequence with many different types of control methods and devices for the positioning of the Axes including:
- PLC’s via Modbus
- Servo Drives via Sercos II directly from the XL200 Series Controller
- MP325(CL) Controllers directly from the XL200 Series Controller
Models Available
All Models
Versions Available
Latest Versions Only
Model Prerequisite
Must have the “X” option. For instance, XL206X.
In this document, it is assumed that the control method for positioning the Axes has been identified and wired to the XL200 Series Controller. This document will not describe how to wire or engineer these devices.
The MP325(CL) axis control has been chosen as the method for demonstration, however, there could be slight variances if the PLC or Servo Drive method has been chosen. These are determined to be minor and will not be shown. The MP325(CL) is a Single Axis Positioning Controller manufactured by AMS Controls. This controller is available in Open Loop or Closed Loop Controls. This document does not describe the MP325(CL) operation, we are only interfacing with this device.
Step 1 – Verifying Auxiliary Devices are Online
To get started, we must first verify the MP325(CL) Controllers are online with the XL200 Series Controller. For this example, we will use an XL206XS Controller with qty (3) SL325(CL) Auxiliary Controllers. When connecting multiple devices to the controller each one will need to have its own Unit ID. For the MP325(CL) Controllers, the Unit ID’s are determined by Dip Switches on the back of the controllers. We have chosen to set the ID’s of the MP325(CL) Controllers to ID 48, 49, and 50. Refer to the SL325 documentation for details.
Once wired and powered on we can check to see if these are online by viewing the diagnostics of the XL206XS Controller. Check to see if they are online by pressing Diagnostics/Multi-Axis Devices.
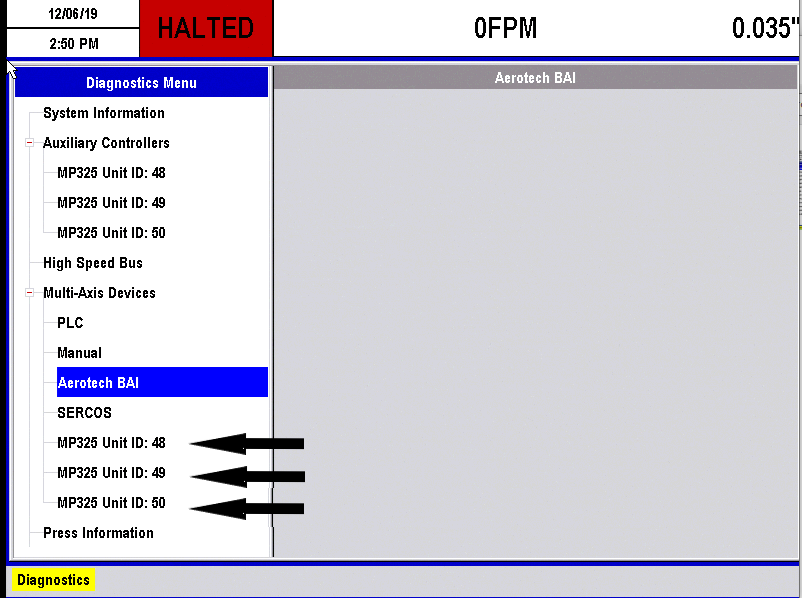
If the devices you have connected are not showing up in this list, you may have to do a search for them. You can search for them by doing the following:
- Press the Diagnostics button on the keypad.
- Highlight “Multi-Axis Devices” on the left navigation pane.
- Press the Right Arrow Key on the keypad.
- Press “F2” on the keypad to “Find Controllers”

Note: If the devices still do not appear in the screen, you will need to troubleshoot wiring and configuration of these controllers.
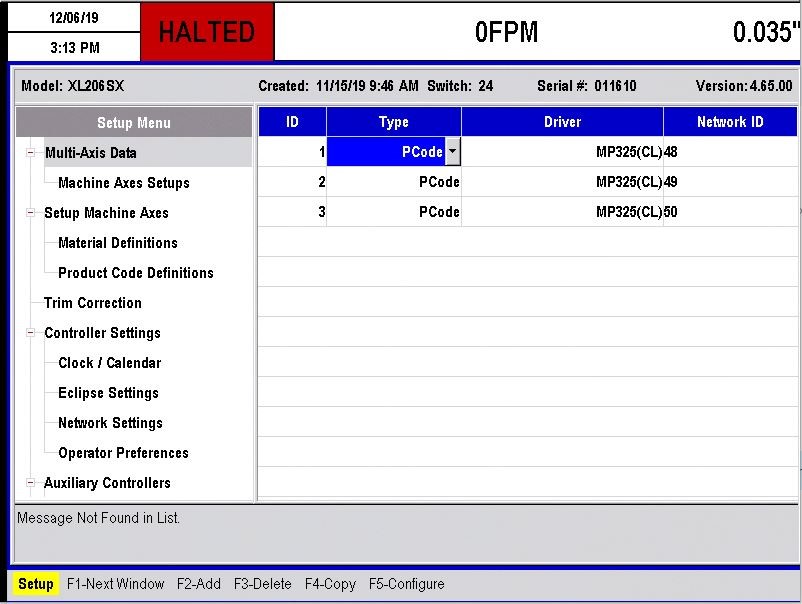
Step 2 – Create Multi-Axis ID’s
Now that we have the MP325(CL) Controllers online with the XL206XS, we can begin configuring the Axes. We must first identify these Axes to the XL206XS Controller.
You can identify the Axes by doing the following:
- Press the Setup button on the keypad.
- Highlight “Multi-Axis Data” on the left navigation pane.
- Press F1 to jump to the right navigation pane or simply touch there on the screen.
- Press F2 to add a new device or F3 to delete a device.
- Note: When adding a new device, a new number will automatically be assigned for the ID. You can rename this by editing the field, but it is recommended to keep this default.
- Set the type of axis we are configuring, for
this example we will be using “PCode,” however, other options that are
available are:
- Tool
- Material-Width
- Material-Gauge
- PLC
- Set the driver for that axis. For our example we are using the MP325(CL) Driver
- Set the Network ID. This should be set to the UNIT ID of the module we want to assign it to.
- Repeat for the number of Axes you have connected.
Step 3 – Configure the Axes
Once Axes have been created, we can go into each axis and configure this particular axis with some initial data.You can configure the axis by doing the following:
- Press the Setup button on the keypad.
- Highlight “Multi-Axis Data” on the left navigation pane.
- Press F1 to jump to the right navigation pane or simply touch there on the screen.
- Highlight the axis ID list you want to configure.
- Press F5 to configure.
- Edit the parameters you wish to change.
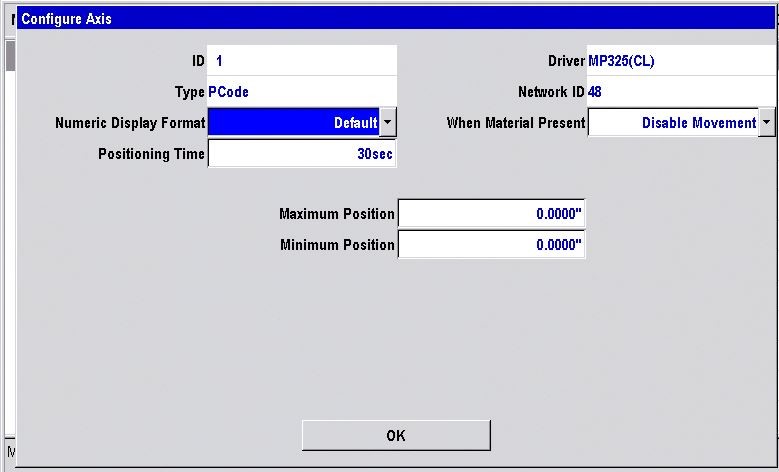
Numeric Display Format – Sets the display format for the numbers of the axis position
Positioning Time – Maximum allowable positioning time for this axis. If the axis has not reached its programmed position in this amount of time, an error will be reported.
When Material Present – The XL206XS Controller monitors the Tail Out input. If the Tail Out is on, material is not present. If the tail out is off, them material is present. From this screen you can choose whether or not to allow this axis to move when material is present or not.
Maximum Position – The maximum allowable programmable position of the axis
Minimum Position – The minimum allowable programmable position of
the axis
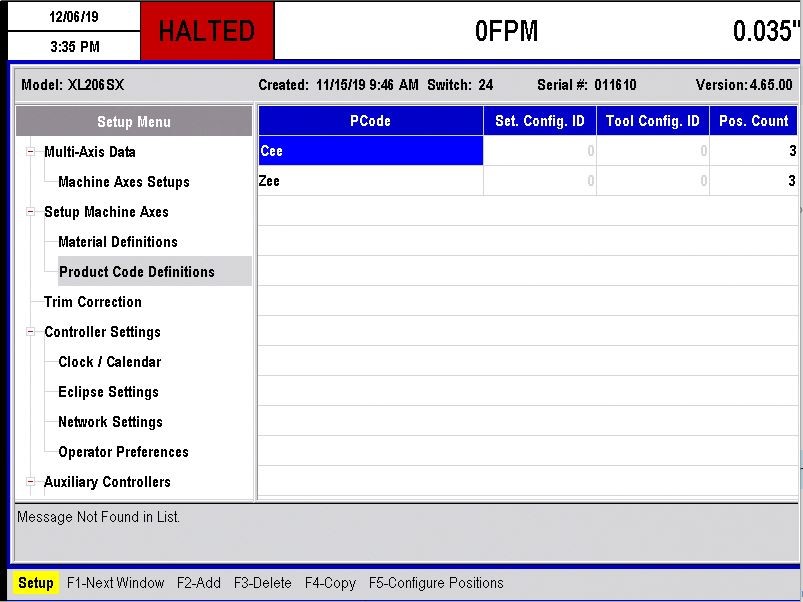
Step 4 – Creating Axis Positions linked to Product Codes
Once the Axes ID’s are created and defined in Step 3, we can now assign axis positions for each product code. You can create the axis positions by doing the following:
- Press the Setup button on the keypad.
- Highlight Setup Machine Axes in the left navigation pane.
- Expand the list by pressing the Right arrow key on the keypad.
- Highlight Product Code Definitions.
- Press F1 to jump to the right navigation pane or simply touch there on the screen.
- Press F2 to add a new PCode to the list or F3 to delete a PCode.
- Enter the name of the PCode you want to use to position. This can be anything you want, however, name it wisely as you will use this PCode name when programming orders and cut lists to be run. Press Enter.
Enter the ID of the axis you wish to position and enter the respective position of that axis.

Step 5 – Loading Positions based on the Product Code
Once the PCodes have been defined in Step 4, load them when required from the XL206XS Controller. Do this as follows:
- Press the Setup button on the keypad.
- Highlight Setup Machine Axes in the left navigation pane.
- Press F3 to Setup PCode Axes.
- Select the PCode Axes you want to load
- Press Move
The XL206X will then send positions to the MP325(CL) Controllers. Once they are in position, the screen will clear and you will be allowed to run.

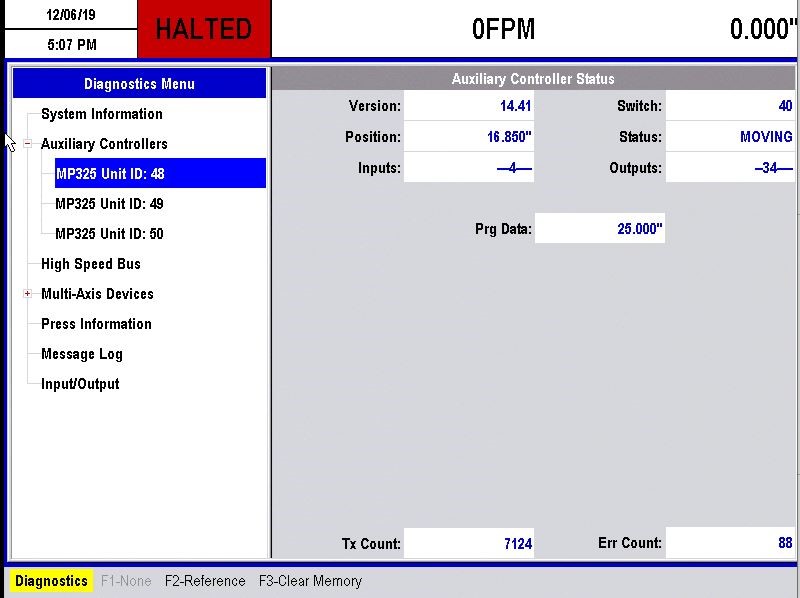
Axes Diagnostics
Each of the MP325(CL) Controllers has it’s own diagnostics screen where you can view data about what is happening with that particular controller. Press Diagnostics/Auxiliary Controllers and choose the one you wish to view.